Dell U2718Q UltraSharp Users Guide
Dell U2718Q Manual
 |
View all Dell U2718Q manuals
Add to My Manuals
Save this manual to your list of manuals |
Dell U2718Q manual content summary:
- Dell U2718Q | UltraSharp Users Guide - Page 1
Dell UltraSharp U2718Q Monitor User's Guide Model: U2718Q Regulatory model: U2718Qb - Dell U2718Q | UltraSharp Users Guide - Page 2
: A CAUTION indicates potential damage to hardware or loss of data if instructions are not followed. WARNING: A WARNING indicates a potential for property damage, personal injury, or death. Copyright © 2017-2019 Dell Inc. All rights reserved. This product is protected by U.S. and international - Dell U2718Q | UltraSharp Users Guide - Page 3
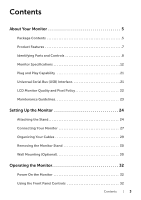
Contents About Your Monitor 5 Package Contents 5 Product Features 7 Identifying Parts and Controls 8 Monitor Specifications 12 Plug and Play Capability 21 Universal Serial Bus (USB) Interface 21 LCD Monitor Quality and Pixel Policy 22 Maintenance Guidelines 23 Setting Up the Monitor 24 - Dell U2718Q | UltraSharp Users Guide - Page 4
49 Adjusting the Rotation Display Settings of Your System 50 Troubleshooting 51 Self-Test 51 Built-in Diagnostics 52 Common Problems 53 Product Specific Problems 55 Universal Serial Bus (USB) Specific Problems 56 Speakers Specific Problems 56 Appendix 57 FCC Notices (U.S. Only) and Other - Dell U2718Q | UltraSharp Users Guide - Page 5
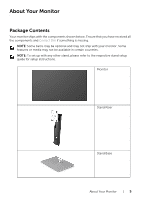
with the components shown below. Ensure that you have received all the components and Contact Dell if something is missing. NOTE: Some items may be optional and may not ship please refer to the respective stand setup guide for setup instructions. Monitor Stand Riser Stand Base About Your Monitor | 5 - Dell U2718Q | UltraSharp Users Guide - Page 6
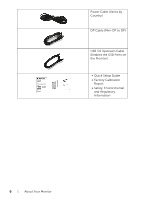
Power Cable (Varies by Country) DP Cable (Mini-DP to DP) USB 3.0 Upstream Cable (Enables the USB Ports on the Monitor) • Quick Setup Guide • Factory Calibration Report • Safety, Environmental, and Regulatory Information 6 | About Your Monitor - Dell U2718Q | UltraSharp Users Guide - Page 7
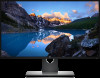
Features The Dell U2718Q flat panel display has an active matrix, Thin-Film Transistor (TFT), Liquid Crystal Display (LCD) and LED backlight. The monitor features include: • 68.47 cm (27-inch) viewable area display (measured diagonally). 3840 x 2160 (16:9) resolution, plus full-screen support for - Dell U2718Q | UltraSharp Users Guide - Page 8
Identifying Parts and Controls Front View Front panel controls Label Description 1 Function buttons (For more information, see Operating the Monitor) 2 Power On/Off button (with LED indicator) 8 | About Your Monitor - Dell U2718Q | UltraSharp Users Guide - Page 9
the regulatory approvals. Releases stand from monitor. Secures monitor with security lock (security lock not included). Refer to this label if you need to contact Dell for technical support. Use to organize cables by placing them through the slot. About Your Monitor | 9 - Dell U2718Q | UltraSharp Users Guide - Page 10
Side View Label Description 1 USB downstream port 2 USB downstream port with Power Charging Use Connect your USB device. You can only use this connector after you have connected the USB cable to the computer and USB upstream connector on the monitor.* Connect to charge your device. * To avoid - Dell U2718Q | UltraSharp Users Guide - Page 11
. Connect your computer with a Mini-DP to DP cable. Connect your speakers.* Connect the USB cable that came with your monitor to the computer. Once M3 x 6 mm screw (screw not included). * Headphone usage is not supported for the audio line out connector. ** To avoid signal interference, when a - Dell U2718Q | UltraSharp Users Guide - Page 12
ratio Faceplate coating Backlight Response time Color depth Color gamut* Calibration accuracy Built-in devices Connectivity Border width (edge of monitor to active area) U2718Q Active matrix - TFT LCD In-Plane Switching Type 16:9 684.7 mm (27 inches) 596.74 mm (23.49 inches) 335.66 mm (13.21 - Dell U2718Q | UltraSharp Users Guide - Page 13
range 10 kHz to 137 kHz (automatic) Vertical scan range 49 Hz to 86 Hz (automatic) Maximum preset resolution 3840 x 2160 at 60Hz Supported Video Modes Model Video display capabilities (HDMI & DP playback) U2718Q 480p, 480i, 576p, 576i, 720p, 1080i, 1080p, QHD, UHD About Your Monitor | 13 - Dell U2718Q | UltraSharp Users Guide - Page 14
75.0 59.9 60.0 75.0 60.0 60.0 59.9 60.0 60.0 * Requires a graphics card that supports HDMI 2.0. Electrical Specifications Pixel Clock (MHz) 25.2 25.2 31.5 28.3 40.0 49.5 65.0 input signals AC input voltage/frequency/ current Inrush current U2718Q • HDMI 2.0, 600 mV for each differential line, - Dell U2718Q | UltraSharp Users Guide - Page 15
Physical Characteristics Model U2718Q Signal cable type • Digital: detachable, HDMI, 19 pins (cable not included) • Digital: detachable, Mini-DP to DP, 20 pins • Universal Serial Bus: detachable, USB, 9 pins - Dell U2718Q | UltraSharp Users Guide - Page 16
Environmental Characteristics Model U2718Q Compliant Standards • RoHS-compliant • TCO-Certified Displays • BFR/PVC-free (Halogen-free) excluding external cables • Meets NFPA 99 leakage current requirements • Arsenic-Free glass and - Dell U2718Q | UltraSharp Users Guide - Page 17
* Zero power consumption in OFF mode can only be achieved by disconnecting the main cable from the monitor. ** Maximum power consumption with max luminance, and USB active. This document is informational only and reflects laboratory performance. Your product may perform differently, depending on the - Dell U2718Q | UltraSharp Users Guide - Page 18
4 ML1(p) 5 GND 6 ML1(n) 7 ML2(p) 8 GND 9 ML2(n) 10 ML3(p) 11 GND 12 ML3(n) 13 GND 14 EDID WP 15 AUX(p) 16 GND 17 AUX(n) 18 Hot Plug Detect 19 Re-PWR 20 +3.3 V DP_PWR Mini DisplayPort Connector Pin 20-pin Side of the Number Connected Signal Cable 1 GND 2 Hot - Dell U2718Q | UltraSharp Users Guide - Page 19
10 ML0(n) 11 ML2(p) 12 ML0(p) 13 GND 14 GND 15 ML1(n) 16 AUX(p) 17 ML1(p) 18 AUX(n) 19 GND 20 +3.3 V DP_PWR About Your Monitor | 19 - Dell U2718Q | UltraSharp Users Guide - Page 20
HDMI Connector Pin 19-pin Side of the Number Connected Signal Cable 1 TMDS DATA 2+ 2 TMDS DATA 2 SHIELD 3 TMDS DATA 2- 4 TMDS DATA 1+ 5 TMDS DATA 1 SHIELD 6 TMDS DATA 1- 7 TMDS DATA 0+ 8 TMDS DATA 0 SHIELD 9 TMDS DATA 0- 10 TMDS CLOCK+ 11 TMDS CLOCK SHIELD 12 TMDS CLOCK- - Dell U2718Q | UltraSharp Users Guide - Page 21
Plug and Play Capability You can install the monitor in any Plug and Play-compatible system. The monitor automatically provides the computer system with its Extended Display Identification Data (EDID) using Display Data Channel (DDC) protocols so the system can configure itself and optimize the - Dell U2718Q | UltraSharp Users Guide - Page 22
USB 3.0 downstream - side • Power Charging Port- the port with battery icon; supports fast current charging capability if the device is BC1.2 compatible. NOTE: USB 3.0 Dell Monitor Quality and Pixel Policy, see Dell Support site at: http://www.dell.com/support/monitors. 22 | About Your Monitor - Dell U2718Q | UltraSharp Users Guide - Page 23
cleaning the monitor. WARNING: Before cleaning the monitor, unplug the monitor power cable from the electrical outlet. For best practices, follow the instructions in the list below while unpacking, cleaning, or handling your monitor: • To clean your anti-static screen, lightly dampen a soft, clean - Dell U2718Q | UltraSharp Users Guide - Page 24
factory. NOTE: This is applicable for a monitor with a stand. When any other stand is bought, please refer to the respective stand setup guide for the setup instructions. CAUTION: Do not remove the monitor from the packaging box before attaching the stand. To attach the monitor stand: 1 Follow the - Dell U2718Q | UltraSharp Users Guide - Page 25
5 Lift the cover, as shown, to expose the VESA area for stand assembly. 6 Attach the stand assembly to the monitor. a Fit the two tabs on the upper part of the stand to the groove on the back of the monitor. b Press the stand down till it snaps into place. Setting Up the Monitor | 25 - Dell U2718Q | UltraSharp Users Guide - Page 26
7 Place the monitor upright. a Slide one hand in the cutout area on the bottom cushion and use the other hand to hold the stand. b Lift the monitor carefully to prevent it from slipping or falling. CAUTION: Do not press on the panel screen when lifting the monitor. 8 Remove the cover from the - Dell U2718Q | UltraSharp Users Guide - Page 27
Connecting Your Monitor WARNING: Before you begin any of the procedures in this section, follow the Safety Instructions. NOTE: Do not connect all cables to the computer at the same time. To connect your monitor to the computer: 1 Turn Off your computer and - Dell U2718Q | UltraSharp Users Guide - Page 28
Connecting the DisplayPort (DP to DP) cable (Optional Purchase) CAUTION: The graphics are used for the purpose of illustration only. Appearance of the computer may vary. 28 | Setting Up the Monitor - Dell U2718Q | UltraSharp Users Guide - Page 29
computer. If your monitor displays an image, installation is complete. If it does not display an image, see Universal Serial Bus (USB) Specific Problems. 5 Use the cable slot on the monitor stand to organize the cables. Organizing Your Cables After attaching all necessary cables to your monitor and - Dell U2718Q | UltraSharp Users Guide - Page 30
surface. NOTE: This is applicable for a monitor with a stand. When any other stand is bought, please refer to the respective stand setup guide for the setup instructions . To remove the stand: 1 Place the monitor on a soft cloth or cushion. 2 Press and hold the stand release button. 3 Lift the stand - Dell U2718Q | UltraSharp Users Guide - Page 31
4 Attach the mounting bracket from the wall mounting kit to the monitor. 5 Mount the monitor on the wall by following the instructions that comes with the wall mounting kit. NOTE: For use only with UL-listed wall mount bracket with minimum weight/load bearing capacity of 3.70 - Dell U2718Q | UltraSharp Users Guide - Page 32
Operating the Monitor Power On the Monitor Press the button to turn On the monitor. Using the Front Panel Controls The front panel control buttons provide quick access to primary software functionalities for controlling the monitor. 32 | Operating the Monitor - Dell U2718Q | UltraSharp Users Guide - Page 33
The following table describes the front panel buttons: Front Panel Button 1 Shortcut key/ Preset Modes 2 Shortcut key/ Input Source 2 Menu 3 Exit 4 Power (with power light indicator) Description Use this button to choose from a list of preset color modes. Use this button to choose from a list of - Dell U2718Q | UltraSharp Users Guide - Page 34
2 Use the Down button to adjust (decrease ranges) items in the OSD menu. Down 3 Use the OK button to confirm your selection. OK 4 Use the Back button to go back to the previous menu. Back Using the On-Screen Display (OSD) Menu Accessing the Menu System NOTE: If you change the settings and - Dell U2718Q | UltraSharp Users Guide - Page 35
of the backlight. Press the button to increase the brightness and press the button to decrease the brightness (min. 0 / max. 100). NOTE: Manual adjustment of Brightness is disabled when Dynamic Contrast is switched On. Adjust the Brightness first, and then adjust the Contrast only if further - Dell U2718Q | UltraSharp Users Guide - Page 36
Input Source Use the Input Source menu to select between the different video signals that may be connected to your monitor. DP mDP HDMI Auto Select Reset Input Source Color Select the DP input when you are using the DisplayPort (DP) connector. Select the mDP input when you are using the Mini - Dell U2718Q | UltraSharp Users Guide - Page 37
applications. • Color Temp.: Allows users to select the color temperature: 5000K, 5700K, 6500K, 7500K, 9300K, and 10000K. • Custom Color: Allows you to manually adjust the R, G, B color settings. Press the and buttons to adjust the R, G, B colors values and create your own preset color mode. NOTE - Dell U2718Q | UltraSharp Users Guide - Page 38
if your monitor is connected to a computer (or DVD player) using an HDMI cable (or DisplayPort cable). YPbPr: Select this option if your DVD player supports only YPbPr output. Hue Saturation Reset Color This feature can shift the color of the video image to green or purple. This is used to - Dell U2718Q | UltraSharp Users Guide - Page 39
higher contrast if you select Game or Movie preset mode. Response Time Allows you to set the Response Time to Normal or Fast. Smart HDR HDR is short for High Dynamic Range. This technology simulates the human visual system to process a wider range of luminosity than traditional imaging technique - Dell U2718Q | UltraSharp Users Guide - Page 40
is 550-nit. The actual value and duration during HDR playback might vary according to the video content. Reset Display Select this option to restore default display settings. Menu Select this option to adjust the - Dell U2718Q | UltraSharp Users Guide - Page 41
Personalize Shortcut Key 1/ Users can choose a feature from Preset Modes, Brightness/Contrast, Shortcut Key 2 Input Source, Aspect Ratio, Smart HDR, or Rotation and set it as a shortcut key. Power Button Allows you to set the power LED indicator On or Off when the LED monitor - Dell U2718Q | UltraSharp Users Guide - Page 42
Others Display Info DDC/CI Displays the monitor's current settings. DDC/CI (Display Data Channel/Command Interface) allows your monitor parameters (brightness, color balance, and etc.) to be adjustable via the software on your computer. You can disable this feature by selecting Off. Enable this - Dell U2718Q | UltraSharp Users Guide - Page 43
run. You can enable this feature by selecting On. Firmware Displays the current firmware version. Reset Others Resets all settings under the Others preset modes: Game or Movie), the manual brightness adjustment is disabled. When the monitor does not support a particular resolution mode, you will - Dell U2718Q | UltraSharp Users Guide - Page 44
NOTE: The message may be slightly different according to the connected input signal. This means that the monitor cannot synchronize with the signal that it is receiving from the computer. See Monitor Specifications for the Horizontal and Vertical frequency ranges addressable by this monitor. - Dell U2718Q | UltraSharp Users Guide - Page 45
. NOTE: The message may be slightly different according to the connected input signal. See Troubleshooting for more information. Setting the Maximum Resolution To set the maximum resolution for the monitor: 2160 as an option, you may need to update your graphics driver. Operating the Monitor | 45 - Dell U2718Q | UltraSharp Users Guide - Page 46
on your computer, complete one of the following procedures: If you have a Dell desktop or portable computer: • Go to http://www.dell.com/support, enter your service tag, and download the latest driver for your graphics card. If you are using a non-Dell computer (portable or desktop): • Go to the - Dell U2718Q | UltraSharp Users Guide - Page 47
XPS8910, Alienware Aurora R5, bundled with the below graphics cards. Dell Graphics driver with HDR support: Refer to Dell support page to download the latest graphics driver that supports HDR playback for your PC/Notebook. Nvidia HDR capable Nvidia graphics cards: GTX1070, GTX1080, P5000, P6000, etc - Dell U2718Q | UltraSharp Users Guide - Page 48
Extension NOTE: This is applicable for a monitor with a stand. When any other stand is bought, please refer to the respective stand setup guide for set up instructions. Tilt, Swivel With the stand attached to the monitor, you can tilt and swivel the monitor for the most comfortable viewing angle - Dell U2718Q | UltraSharp Users Guide - Page 49
Rotating the Monitor Before you rotate the monitor, your monitor should be fully vertically extended (Vertical Extension) and fully tilted up to avoid hitting the bottom edge of the monitor. Rotate clockwise Rotate counterclockwise Operating the Monitor | 49 - Dell U2718Q | UltraSharp Users Guide - Page 50
that is not included with this monitor. To download the graphics driver, go to www.dell.com/support and see the Download section for Video Drivers for latest driver updates. NOTE: When in the Portrait View Mode, you may experience performance degradation in graphic-intensive applications (3D Gaming - Dell U2718Q | UltraSharp Users Guide - Page 51
Troubleshooting WARNING: Before you begin any of the procedures in this section, follow the Safety Instructions. Self-Test Your monitor provides a self-test feature that allows you to check , check your video controller and computer, because your monitor is functioning properly. Troubleshooting | 51 - Dell U2718Q | UltraSharp Users Guide - Page 52
a built-in diagnostic tool that helps you determine if the screen abnormality you are experiencing is an inherent problem with your monitor, or with your computer and video card. NOTE: You can run the built-in monitor is functioning properly. Check the video card and computer. 52 | Troubleshooting - Dell U2718Q | UltraSharp Users Guide - Page 53
Dell Monitor Quality and Pixel Policy, see Dell Support site at: http://www.dell.com/ support/monitors. • Reset the monitor to factory settings. • Adjust brightness & contrast controls via OSD. • Reset the monitor to factory settings. • Adjust horizontal & vertical controls via OSD. Troubleshooting - Dell U2718Q | UltraSharp Users Guide - Page 54
lines Synchronization Screen is Problems scrambled or appears torn Safety Related Issues Intermittent Problems Visible signs of smoke the computer in the safe mode. • Do not perform any troubleshooting steps. • Contact Dell immediately. • Ensure that the video cable connecting the monitor to - Dell U2718Q | UltraSharp Users Guide - Page 55
Product Specific Problems Specific Symptoms What You Experience Screen image is Image is too small centered on screen, but does not fill entire • Due to different video formats (aspect ratio) of DVDs, the monitor may display in full screen. • Run the built-in diagnostics. Troubleshooting | 55 - Dell U2718Q | UltraSharp Users Guide - Page 56
receiver as far away as possible from the USB 3.0 port. Speakers Specific Problems Specific Symptoms No sound coming from the speakers What You Experience Cannot hear any sound Possible Solutions • Turn Off the Audio Line Out port. • Reset the monitor to factory settings. 56 | Troubleshooting - Dell U2718Q | UltraSharp Users Guide - Page 57
hazards, and/or mechanical hazards. For information on safety instructions, see the Safety, Environmental, and Regulatory Information (SERI Dell product catalog. Dell provides several online and telephone-based support and service options. Availability varies by country and product, and some services
-
 1
1 -
 2
2 -
 3
3 -
 4
4 -
 5
5 -
 6
6 -
 7
7 -
8
-
9
-
10
-
11
-
12
-
13
-
14
-
15
-
16
-
17
-
18
-
19
-
20
-
21
-
22
-
23
-
24
-
25
-
26
-
27
-
28
-
29
-
30
-
31
-
32
-
33
-
34
-
35
-
36
-
37
-
38
-
39
-
40
-
41
-
42
-
43
-
44
-
45
-
46
-
47
-
48
-
49
-
50
-
51
-
52
-
53
-
54
-
55
-
56
-
57
 |
 |

Dell UltraSharp U2718Q Monitor
User’s Guide
Model: U2718Q
Regulatory model: U2718Qb