Dell W-Series 228 W-AP228 Access Point Installation Guide - Page 9
Verifying Post-Installation Connectivity, Configuring the AP
 |
View all Dell W-Series 228 manuals
Add to My Manuals
Save this manual to your list of manuals |
Page 9 highlights
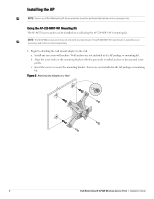
4. Remove the weatherproof cap on the Ethernet port. 5. Insert the RJ45 connector to the Ethernet port. 6. Screw the clamping ring onto the Ethernet port. 7. Screw the sealing nut onto the clamping ring. NOTE: The seal inside the clamping ring is applicable for cables with 5-8.5 mm diameter. In the cable gland kit, another seal is provided for use with the cables with 7-10 mm diameter. Verifying Post-Installation Connectivity The integrated LEDs on the AP can be used to verify that the AP is receiving power and initializing successfully (see Table 1 and Table 2). Refer to the Dell Networking W-Series ArubaOS Quick Start Guide for details on verifying post-installation network connectivity. Configuring the AP AP Provisioning/Reprovisioning Provisioning parameters are unique to each AP. These local AP parameters are initially configured on the controller which are then pushed out to the AP and stored on the AP itself. Dell recommends that provisioning settings be configured via the ArubaOS Web UI only. Refer to the Dell Networking W-Series ArubaOS User Guide for details. AP Configuration Configuration parameters are network or controller specific and are configured and stored on the controller. Network configuration settings are pushed out to the AP(s) but remain stored on the controller. Configuration settings can be configured via the Dell Networking W-Series ArubaOS Web UI or CLI. Refer to the Dell Networking W-Series ArubaOS User Guide for details. Dell Networking W-AP228 Wireless Access Point | Installation Guide 9
-
 1
1 -
2
-
3
-
 4
4 -
 5
5 -
 6
6 -
 7
7 -
 8
8 -
 9
9 -
 10
10 -
 11
11 -
 12
12 -
 13
13 -
 14
14 -
15
-
16
 |
 |
