Dell XPS 13 7390 2-in-1 Service Manual - Page 32
Steps, If you are installing components to a new palm-rest assembly
 |
View all Dell XPS 13 7390 2-in-1 manuals
Add to My Manuals
Save this manual to your list of manuals |
Page 32 highlights
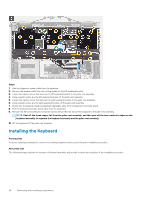
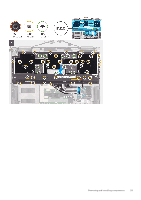
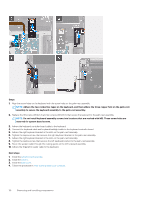
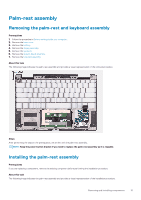
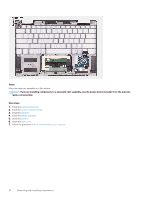
Steps Place the palm-rest assembly on a flat surface. NOTE: If you are installing components to a new palm-rest assembly, use the power-button bracket from the previous palm-rest assembly. Next steps 1. Install the keyboard assembly. 2. Install the system-board assembly. 3. Install the speakers. 4. Install the display assembly. 5. Install the battery. 6. Install the base cover. 7. Follow the procedure in After working inside your computer. 32 Removing and installing components
-
 1
1 -
2
-
3
-
4
-
5
-
6
-
7
-
8
-
9
-
10
-
11
-
12
-
13
-
14
-
15
-
16
-
17
-
18
-
19
-
20
-
21
-
22
-
23
-
24
-
25
-
26
-
 27
27 -
 28
28 -
 29
29 -
 30
30 -
 31
31 -
 32
32 -
 33
33 -
 34
34 -
 35
35 -
 36
36 -
 37
37 -
38
-
39
-
40
-
41
-
42
-
43
-
44
-
45
-
46
-
47
-
48
-
49
 |
 |

Steps
Place the palm-rest assembly on a flat surface.
NOTE:
If you are installing components to a new palm-rest assembly, use the power-button bracket from the previous
palm-rest assembly.
Next steps
1.
Install the
keyboard assembly
.
2.
Install the
system-board assembly
.
3.
Install the
speakers
.
4.
Install the
display assembly
.
5.
Install the
battery
.
6.
Install the
base cover
.
7.
Follow the procedure in
After working inside your computer
.
32
Removing and installing components