Dell XPS M140 MXC051 XPS M140 Owners Manual - Page 112
Memory, Product Information Guide
 |
View all Dell XPS M140 MXC051 manuals
Add to My Manuals
Save this manual to your list of manuals |
Page 112 highlights
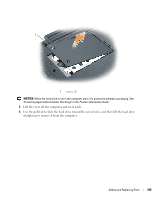
www.dell.com | support.dell.com 4 Insert a Phillips screwdriver into the screw hole to push the drive out of the module bay. 5 Pull the drive straight out of the module bay. 6 Push the new drive straight into the module bay until it clicks. 7 Replace the security device screw. 8 Turn the computer right-side up and open the display. 9 The operating system automatically recognizes the drive. If necessary, enter your password to unlock your computer. Memory You can increase your computer memory by installing memory modules on the system board. See "Specifications" on page 131 for information on the memory supported by your computer. Install only memory modules that are intended for your computer. NOTE: Memory modules purchased from Dell are covered under your computer warranty. CAUTION: Before you begin any of the procedures in this section, follow the safety instructions in the Product Information Guide. The computer has two memory module connectors labeled "DIMM A" and "DIMM B." Connector DIMM A (located under the keyboard) holds the basic memory module as configured from the factory. If you did not order additional memory, connector DIMM B (located on the bottom of the computer under the memory module cover) will be empty. Generally, if you are adding memory, 112 Adding and Replacing Parts
-
 1
1 -
2
-
3
-
4
-
5
-
6
-
7
-
8
-
9
-
10
-
11
-
12
-
13
-
14
-
15
-
16
-
17
-
18
-
19
-
20
-
21
-
22
-
23
-
24
-
25
-
26
-
27
-
28
-
29
-
30
-
31
-
32
-
33
-
34
-
35
-
36
-
37
-
38
-
39
-
40
-
41
-
42
-
43
-
44
-
45
-
46
-
47
-
48
-
49
-
50
-
51
-
52
-
53
-
54
-
55
-
56
-
57
-
58
-
59
-
60
-
61
-
62
-
63
-
64
-
65
-
66
-
67
-
68
-
69
-
70
-
71
-
72
-
73
-
74
-
75
-
76
-
77
-
78
-
79
-
80
-
81
-
82
-
83
-
84
-
85
-
86
-
87
-
88
-
89
-
90
-
91
-
92
-
93
-
94
-
95
-
96
-
97
-
98
-
99
-
100
-
101
-
102
-
103
-
104
-
105
-
106
-
 107
107 -
 108
108 -
 109
109 -
 110
110 -
 111
111 -
 112
112 -
 113
113 -
 114
114 -
 115
115 -
 116
116 -
 117
117 -
118
-
119
-
120
-
121
-
122
-
123
-
124
-
125
-
126
-
127
-
128
-
129
-
130
-
131
-
132
-
133
-
134
-
135
-
136
-
137
-
138
-
139
-
140
-
141
-
142
-
143
-
144
-
145
-
146
-
147
-
148
-
149
-
150
-
151
-
152
-
153
-
154
-
155
-
156
-
157
-
158
-
159
-
160
-
161
-
162
-
163
-
164
-
165
-
166
-
167
-
168
-
169
-
170
-
171
-
172
-
173
-
174
-
175
-
176
-
177
-
178
-
179
-
180
 |
 |
