Denon AVR-2311CI Owners Manual - English - Page 65
Option Setup
 |
UPC - 883795001366
View all Denon AVR-2311CI manuals
Add to My Manuals
Save this manual to your list of manuals |
Page 65 highlights
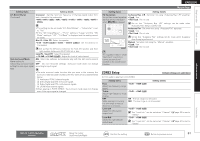
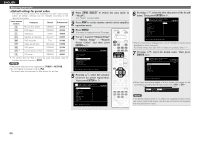
ENGLISH Manual Setup Setting items Setting details Channel Set the signal output from ZONE2. Volume Level Set the volume output level. Stereo : Select stereo output. Mono : Select mono output. Variable : Volume adjustment is enabled by main unit and remote control unit. -40dB (41) : Fix volume at -40 dB. Set when adjusting volume by external amplifier. 0dB (81) : Fix volume at 0 dB. Set when adjusting volume by external amplifier. Volume Limit Make a setting for maximum volume. When "Amp Assign" (vpage 57) is set to "ZONE2", the "Volume Level" setting is automatically set to "Variable". OFF : Do not set a maximum volume. -20dB (61) / -10dB (71) / 0dB (81) Power On Level Define the volume setting that is active when the power is turned on. • This can be set when the multi-zone "Volume Level" setting (vpage 62) is "Variable". • This is displayed from 0 to 99 when "Volume Display" (vpage 62) is set to "Absolute". Last : Use the memorized setting from the last session. - - - (0) : Always mute when power is turned on. -80dB - 18dB (1 - 99) : The volume is adjusted to the set level. Mute Level Set the amount of attenuation when muting is on. • This can be set when the multi-zone "Volume Level" setting (vpage 62) is "Variable". • This is displayed from 0 to 99 when "Volume Display" (vpage 62) is set to "Absolute". Full : The sound is muted entirely. -40dB : The sound is attenuated by 40 dB down. -20dB : The sound is attenuated by 20 dB down. Option Setup Default settings are underlined. Make various other settings. Setting items Volume Control Set the MAIN ZONE (room where the unit is located) volume setting. Setting details Volume Display : Set how volume is displayed. • Relative : Display ---dB (Min), in the range -80.5 dB - 18 dB. • Absolute : Display in the range 0 (Min) - 99. • The "Volume Display" setting is applied also to the "Volume Limit" and "Power On Level" display method. • The "Volume Display" setting applies to all zones. Volume Limit : Make a setting for maximum volume. • OFF : Do not set a maximum volume. • -20dB (61) / -10dB (71) / 0dB (81) 62 Remote control operation buttons Move the cursor (Up/Down/Left/Right) Setting items Setting details Volume Control (Continued) Source Delete Remove from the display input sources that are not used. Power On Level : Define the volume setting that is active when the power is turned on. • Last : Use the memorized setting from the last session 0) : Always use the muting on condition when power is turned on. • -80dB - 18dB (1 - 99) : The volume is adjusted to the set level. Mute Level : Set the amount of attenuation when muting is on. • Full : The sound is muted entirely. • -40dB : The sound is attenuated by 40 dB down. • -20dB : The sound is attenuated by 20 dB down. BD / DVD / TV / SAT/CBL / DVR / GAME / V.AUX / DOCK / USB/iPod / HD Radio / CD : Select input source that is not used. • ON : Use this source. • Delete : Do not use this source. NOTE GUI Make the settings related to displays on the TV screen. • Input sources being used in the various zones cannot be deleted. • Input sources set to "Delete" cannot be selected using SOURCE SELECT. Screensaver : Make screensaver settings. • ON : The screen saver is activated during menu display, iPod, USB/iPod or HD Radio screen display if no operation is performed for an approximately 3-minute continuous period. When you press uio p, the screensaver is cancelled and the screen before that screen saver started is displayed. • OFF : Screensaver is not activated. Wall Paper : Set wallpaper to display in the background when playback is stopped, etc. • Picture : Set the background to a picture (DENON logo). • Black : Set the background to black. Format : Set the video signal format to be output for the TV you are using. • NTSC : Select NTSC output. • PAL : Select PAL output. "Format" can also be set by the following procedure. However, the menu screen is not displayed. 1. Press and hold the main unit's p and i for at least 3 seconds. "Video Format" appears on the display. 2. Press o p and set the video signal format. 3. Press the main unit's ENTER, MENU or RETURN to complete the setting. Confirm the setting Return to previous menu
-
 1
1 -
2
-
3
-
4
-
5
-
6
-
7
-
8
-
9
-
10
-
11
-
12
-
13
-
14
-
15
-
16
-
17
-
18
-
19
-
20
-
21
-
22
-
23
-
24
-
25
-
26
-
27
-
28
-
29
-
30
-
31
-
32
-
33
-
34
-
35
-
36
-
37
-
38
-
39
-
40
-
41
-
42
-
43
-
44
-
45
-
46
-
47
-
48
-
49
-
50
-
51
-
52
-
53
-
54
-
55
-
56
-
57
-
58
-
59
-
 60
60 -
 61
61 -
 62
62 -
 63
63 -
 64
64 -
 65
65 -
 66
66 -
 67
67 -
 68
68 -
 69
69 -
 70
70 -
71
-
72
-
73
-
74
-
75
-
76
-
77
-
78
-
79
-
80
-
81
-
82
-
83
-
84
-
85
-
86
-
87
-
88
-
89
-
90
 |
 |