Denon D-M38 Owners Manual - English - Page 7

Part names and functions - remote control

Page 7 highlights

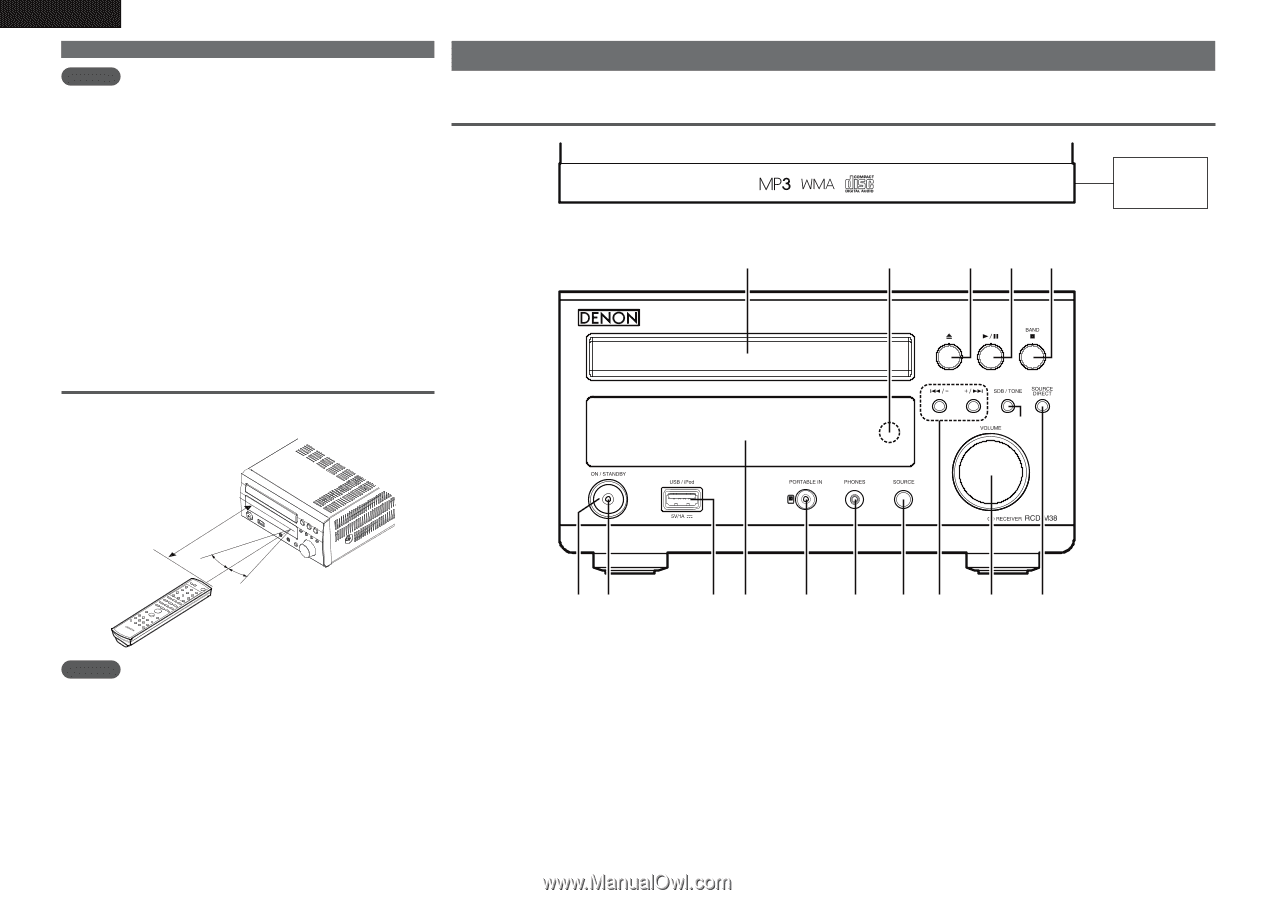
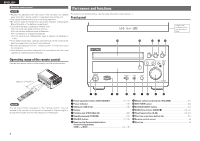
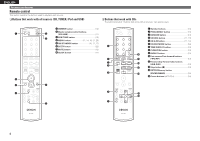
ENGLISH About the remote control Part names and functions NOTE • Replace the batteries with new ones if the set does not operate For buttons not explained here, see the page indicated in parentheses ( ). even when the "remote control" is operated close to the unit. • The supplied batteries are only for verifying operation. Front panel • Be sure to insert the batteries in the proper direction, following the q and w marks in the battery compartment. • To prevent damage or leakage of battery fluid: • Do not use a new battery with an old one. • Do not use two different types of batteries. • Do not attempt to charge dry batteries. • Do not short-circuit, disassemble, heat or dispose of batteries in a fire. • If the battery fluid leaks, carefully wipe the fluid off the inside of the Q6 Q5 battery compartment and insert new batteries. • Remove the batteries from the "remote control" if it will not be used for a long time. • Used batteries should be disposed of in accordance with the local regulations regarding battery disposal. Operating range of the remote control Operate the remote control while pointing it at the remote sensor. Q4 Q3 Q2 Image when viewed from the top of the front panel Q0 Approx. 23 feet/7 m 30° 30° qw er t y u i o Q1 NOTE The set may function improperly or the "remote control" may not operate if the remote control sensor is exposed in direct sunlight or strong artificial light such as a fluorescent or infrared light. q Power operation button (ON/STANDBY 11, 17) w Power indicator 10) e USB port (USB/iPod 16) r Display t Portable jack (PORTABLE IN 20) y Headphones jack (PHONES 12) u SOURCE button 11, 20) i Reverse-skip/Forward-skip buttons Preset/Tuning buttons (8/-, +/9 12 - 15) o Master volume control knob (VOLUME 11) Q0 SDB/TONE button 12) Q1 SOURCE DIRECT button 12) Q2 BAND/Stop button (BAND/2 14, 21) Q3 Play/Pause button (1/3 13, 21) Q4 Disc tray open/close button (5 11) Q5 Remote control sensor 4) Q6 Disc tray 3) 4

  • 1
  • 2
  • 3
  • 4
  • 5
  • 6
  • 7
  • 8
  • 9
  • 10
  • 11
  • 12
  • 13
  • 14
  • 15
  • 16
  • 17
  • 18
  • 19
  • 20
  • 21
  • 22
  • 23
  • 24
  • 25
  • 26
  • 27
  • 28
  • 29
  • 30
  • 31
  • 32
  • 33
  • 34
  • 35
  • 36
  • 37

ENGLISH
4
q
Power operation button (ON/STANDBY)
······················· (11, 17)
w
Power indicator
······································································· (10)
e
USB port (USB/iPod)
······························································ (16)
r
Display
t
Portable jack (PORTABLE IN)
················································· (20)
y
Headphones jack (PHONES)
··················································· (12)
u
SOURCE button
································································· (11, 20)
i
Reverse-skip/Forward-skip buttons
Preset/Tuning buttons
(
8
/–, +/
9
)
·································································(12 – 15)
o
Master volume control knob (VOLUME)
······························· (11)
Q
0
SDB/TONE button
··································································· (12)
Q
1
SOURCE DIRECT button
························································· (12)
Q
2
BAND/Stop button (BAND/
2
)
········································· (14, 21)
Q
3
Play/Pause button (
1
/
3
)
·················································· (13, 21)
Q
4
Disc tray open/close button (
5
)
············································· (11)
Q
5
Remote control sensor
····························································· (4)
Q
6
Disc tray
····················································································· (3)
NOTE
• Replace the batteries with new ones if the set does not operate
even when the “remote control” is operated close to the unit.
• The supplied batteries are only for verifying operation.
• Be sure to insert the batteries in the proper direction, following the
q
and
w
marks in the battery compartment.
• To prevent damage or leakage of battery fluid:
• Do not use a new battery with an old one.
• Do not use two different types of batteries.
• Do not attempt to charge dry batteries.
• Do not short-circuit, disassemble, heat or dispose of batteries in
a fire.
• If the battery fluid leaks, carefully wipe the fluid off the inside of the
battery compartment and insert new batteries.
• Remove the batteries from the “remote control” if it will not be used
for a long time.
• Used batteries should be disposed of in accordance with the local
regulations regarding battery disposal.
Operating range of the remote control
Operate the remote control while pointing it at the remote sensor.
30°
30°
Approx. 23 feet/7 m
NOTE
The set may function improperly or the “remote control” may not
operate if the remote control sensor is exposed in direct sunlight or
strong artificial light such as a fluorescent or infrared light.
Part names and functions
For buttons not explained here, see the page indicated in parentheses (
).
Front panel
qw
e
r
t
y
u
o
i
Q
1
Q
2
Q
3
Q
4
Q
0
Q
6
Q
5
Image when
viewed from the
top of the front
panel
About the remote control