Denon DRM-555 Operating Instructions - Page 14
Timer Recording/playback
 |
View all Denon DRM-555 manuals
Add to My Manuals
Save this manual to your list of manuals |
Page 14 highlights
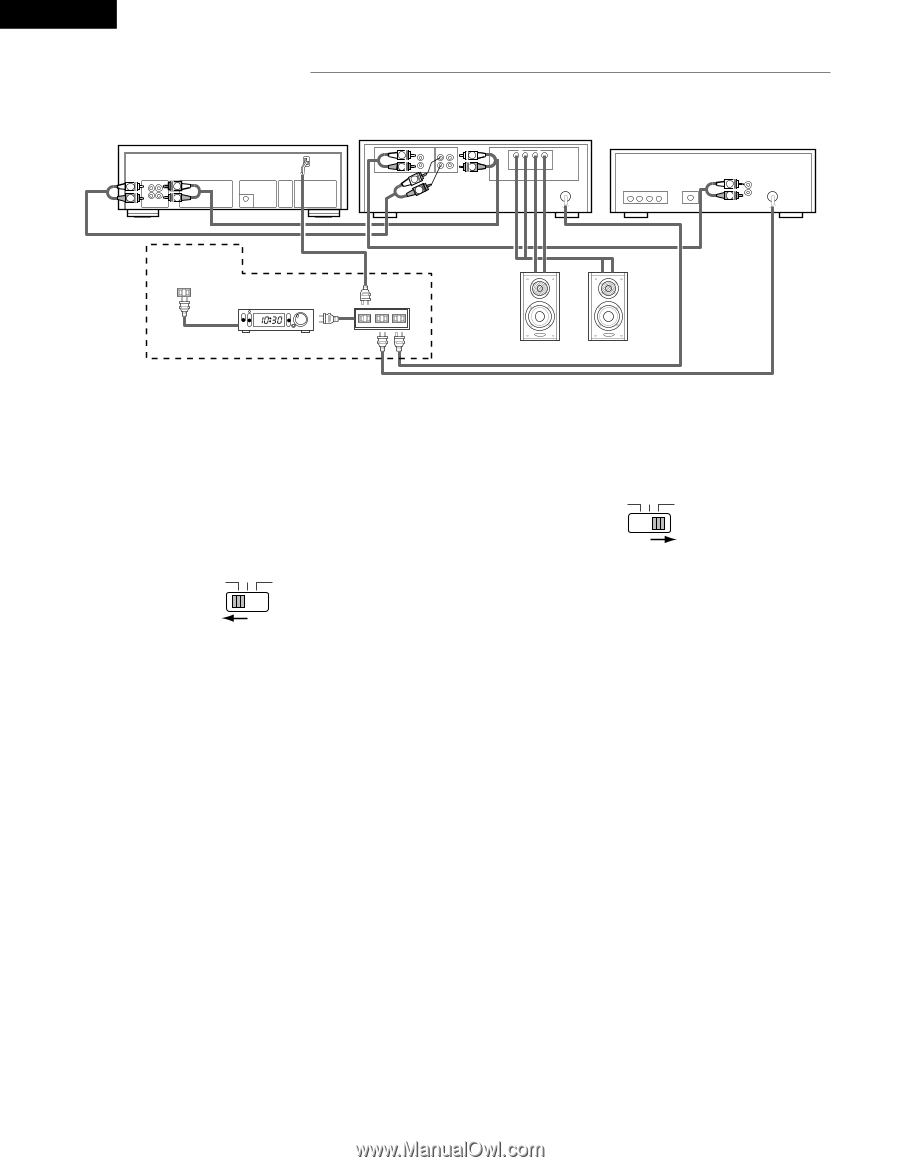
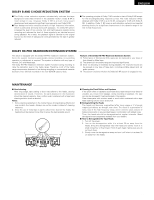
ENGLISH TIMER RECORDING/PLAYBACK Timer recording/playback can be made using any audio timer available on the market. DRM-555 LINE OUT IN L L L R R R LINE LINE OUT IN SYNCHRO Amplifier L TUNER PB REC L L R R R L TAPE-1 R R L A SP B Tuner OUT PUT L R Wall outlet Timer AM On timer recording/playback Lch Rch Speaker System • Timer recording procedure 1. Make sure the connections are correct, especially the power supply connections. 2. Turn on the power switch of each appliance. 3. Tune the desired station on the tuner. 4. Load the tape for recording. (Make sure the erase prevention tab is not broken off; if it is, cover the hole with plastic tape). 5. Set the Dolby NR switch (DOLBY NR) to the appropriate position. 6. Make sure the Monitor switch to the SOURCE position. 7. Adjust the recording input level. 8. Set the starting position of the tape. 9. Set the Timer switch (TIMER) to the "REC" side. TIMER REC OFF PLAY 10. Set the audio timer to the desired time. The audio timer will turn the power supply on at the desired time. ˞ With the above procedures, timer controlled recording can be made. When the preset time comes, the power is supplied and the FM broadcast can be recorded. • Timer playback procedure 1. Make sure the connections are correct, especially the power supply connections. 2. Turn on the power switch of each appliance. 3. Load the pre-recorded tape to be played back. 4. Set the Dolby NR switch (DOLBY NR) to the appropriate positions. 5. Set the Monitor switch of the Amplifier to the TAPE position. 6. Press the Play button (PLAY) and playback the tape; adjust the playback level. Press the Stop button ( 2 STOP). 7. Set the Timer switch (TIMER) to the "PLAY" side. TIMER REC OFF PLAY 8. Set the audio timer to the desired time. The audio timer will turn the power supply on at the desired time. ˞ With the above procedures, timer playback can be accomplished. When the preset time comes, the power is supplied and playback will start. Notes: • Please read the operating instructions for the timer before use. • If the timer recording or playback is not desired, be sure to switch the Timer switch (TIMER) to "OFF". • When using timers that allow several "ON/OFF" operations, timer start functioning can continue an unlimited number of times until the tape in the machine is finished. 14
-
 1
1 -
2
-
3
-
4
-
5
-
6
-
7
-
8
-
 9
9 -
 10
10 -
 11
11 -
 12
12 -
 13
13 -
 14
14 -
 15
15 -
 16
16 -
 17
17 -
 18
18 -
 19
19 -
20
-
21
-
22
 |
 |