Denon DRM-555 Operating Instructions - Page 7
Cassette Tapes - cassette deck remote
 |
View all Denon DRM-555 manuals
Add to My Manuals
Save this manual to your list of manuals |
Page 7 highlights
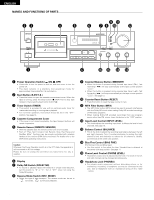
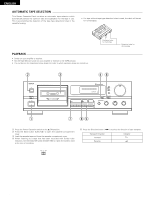
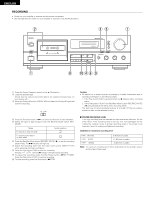
ENGLISH !7 Tape Transport Buttons PLAY 2 STOP 6 7 Play Button Stop Button Fast Rewind Button Fast Forward Button 4 Rec/Rec Mute Button 3 REC PAUSE 01 Rec Pause Button Direction Button Press to playback tape. Press to stop the tape in any mode. Press for fast rewind. Press for fast forwarding. Press the Rec/Rec Mute button (REC/REC MUTE) ( 4 ) and Play button (PLAY) simultaneously to start recording. If only the Rec/Rec Mute button (REC/REC MUTE) ( 4 ) is pressed, the deck enters the recording pause mode. Pressing this button in the recording pause mode will start Auto Rec Mute, and a 5-second silent space is recorded onto the tape. Press this button to enter the recording pause mode from the recording or recording mute mode. This button can only be used during recording. Changes the tape transport direction from forward "1" to reverse "0", and vice versa. y Display • Indicators with an encircled number light up when the corresponding button is pressed. Peak Level Meter Indicates the recording and playback signal levels for the left and right channels. Tape Transport Indicators dB -40 -30 -20 -10 -5 -3 -1 L R 0 +1 +3 +5 +10 MPX SYNC MEMO MPX Filter Indicator Remote Control Indicator Tape Counter Synchro Rec Indicator (See page 12) Memory Indicator CASSETTE TAPES 2 Handling Precautions • C-120 cassette tapes C-120 cassette tapes are not recommended as they use a very thin tape base which may become tangled around the capstan or pinch roller. • Tape Slack Before putting a tape into the deck, take up any slack with a pencil or your finger tip. This precaution prevents the tape from becoming entangled around the capstan or pinch roller. A 2 Storage Precautions • Do not store cassette tapes in a place where they will be subject to: • Extremely high temperature or excessive moisture • Excessive dust • Direct sunlight • Magnetic fields (near TV sets or speakers) • To eliminate tape slack, store your cassettes in cassette cases with hub stops 2 Accidental Erasure Prevention • All cassettes have erasure prevention tabs for each side. To protect valuable recordings from accidental or inadvertent erasure, remove the tab for the appropriate side with a screwdriver or another tool. • To record on a tape whose erasure prevention tabs have been removed, cover the tab holes with adhesive tape. Side A Erasure prevention tab for side A Erasure prevention tab for side B 7
-
 1
1 -
 2
2 -
 3
3 -
 4
4 -
 5
5 -
 6
6 -
 7
7 -
 8
8 -
 9
9 -
 10
10 -
 11
11 -
 12
12 -
13
-
14
-
15
-
16
-
17
-
18
-
19
-
20
-
21
-
22
 |
 |