Denon DRM-555 Operating Instructions - Page 15
Dolby B And C Noise Reduction System, Dolby Hx-pro Headroom Extension System, Maintenance
 |
View all Denon DRM-555 manuals
Add to My Manuals
Save this manual to your list of manuals |
Page 15 highlights
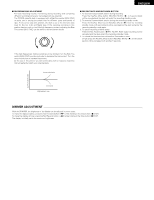
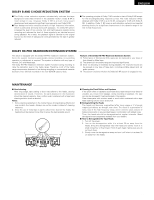
ENGLISH DOLBY B AND C NOISE REDUCTION SYSTEM 2 The Dolby noise reduction system substantially reduces the tape background noise (hiss) inherent in the cassette medium. Dolby B NR is most widely in use. However Dolby C NR is a much more recent development and represents significant improvements over Dolby B NR. 2 Tape background noise consists primarily of high frequency information, which is particularly annoying during soft passages. The Dolby NR system increases the level of low volume mid- and high-frequency signals during recording and reduces the level of these signals by an identical amount during playback. As a result, the playback signal is identical to the original source, but the level of background noise generated by the tape is greatly reduced. 2 The operating principle of Dolby C NR is similar to that of Dolby B NR except for the encoding/decoding response curves. The noise reduction effect obtained with Dolby C NR is up to 20 dB, compared to 10 dB with Dolby B NR. In addition, Dolby C NR uses an anti-saturation network and spectral skewing circuitry for a significant improvement in the dynamic range of the mid- to high-frequencies. DOLBY HX-PRO HEADROOM EXTENSION SYSTEM This deck is equipped with the Dolby HX-PRO headroom extension system. Since the system functions automatically during recording, no switching operation or adjustment is required. The system is effective with any type of Normal, CrO2 and Metal tape. The Dolby HX-PRO headroom extension system functions during recording to raise the saturation level in the treble range. Therefore, most of the treble range components distorted or lost during recording on conventional cassette decks are more faithfully recorded on the new DENON cassette deck. Features of the Dolby HX-PRO Headroom Extension System (1) Performance of Normal and CrO2 tapes can be improved to very close of that offered by Metal tape. (2) The dynamics in the treble range are improved significantly. (3) Since no decoding is necessary during playback, the improved sound can be enjoyed on any type of tape deck, including portable players and car audio systems. (4) The system functions whether the Dolby B/C NR system is engaged or not. MAINTENANCE 2 Head cleaning After long usage, tape coating or dust may adhere to the heads, causing deterioration of sound. Therefore, the parts depicted in the illustration should be cleaned regularly. Use a cotton swab moistened with a tape head cleaning solution (such as alcohol). Notes: 1. Some cleaning cassettes on the market have a strong abrasive effects and may scratch the heads. Always use cotton swabs instead of cleaning cassettes. 2. Since the use of metal tape is apt to collect more dust on the heads, the heads should be cleaned more often to enjoy the best possible sound. 2 Cleaning the Pinch Rollers and Capstans If the pinch rollers or capstans accumulate dust, tape transport may become unstable, as a result from slippage, during recording or playback. The tape can also be damaged if it gets entangled in the capstan. Clean these parts with a cotton swab or a soft cloth moistened with a tape head cleaning solution (such as alcohol). 2 Demagnetizing the Heads The heads will become magnetized after long usage or if strongly magnetized objects are brought near them. The result is a generation of noise, loss of the high frequency range, and in extreme cases erasure of treble components on pre-recorded tapes in combination with added noise. Thus, the heads should be demagnetized at regular intervals. (Head demagnetizers are separately available from your dealer.) 2 How to Demagnetize the Tape Heads 1. Turn off the power. 2. Turn on the demagnetizer while it is at least 30 cm away from the heads. Bring the demagnetizer near the heads and slowly move it in small circles four or five times in front of each head, making sure you do not touch them. 3. Slowly move the demagnetizer away and turn it off when it is at least 30 cm away from the heads. 15
-
 1
1 -
2
-
3
-
4
-
5
-
6
-
7
-
8
-
9
-
 10
10 -
 11
11 -
 12
12 -
 13
13 -
 14
14 -
 15
15 -
 16
16 -
 17
17 -
 18
18 -
 19
19 -
 20
20 -
21
-
22
 |
 |