Denon DVD 3800BDCI Owners Manual - English - Page 27
Gamma correction
 |
UPC - 083795000172
View all Denon DVD 3800BDCI manuals
Add to My Manuals
Save this manual to your list of manuals |
Page 27 highlights
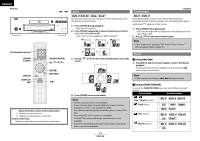
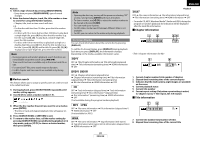
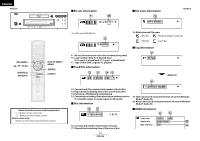
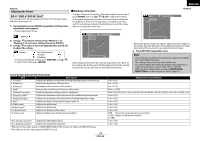
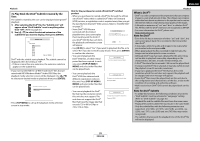
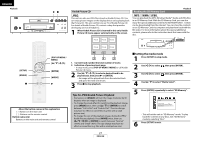
ENGLISH Playback Adjusting the Picture BD-V DVD-V DVD-VR DivX® You can adjust the picture quality and store the setting you have adjusted on memory 1-5. 1) During playback, press [MODE] repeatedly until the picture adjustment menu appears. • Picture adjustment menu: Ⅵ Gamma correction • To adjust "Gamma Correction", after selecting the item at step 3, press [ENTER], then use [U / V / Y / Z] to adjust the setting. • In the graph of gamma correction, the horizontal axis indicates the brightness level of the image that is recorded on the disc, and the vertical axis indicates the brightness level of the image when it is output from this unit. Memory 1 GO : 0 2 4 255 5. Gamma Correction Playback Memory 1 2) Use [U / V] to select a memory from "Memory 1" to "Memory 5" to store your setting, then press [ENTER]. 3) Use [U / V] to select a item to be adjusted, then use [Y / Z] to adjust the setting. Memory 1 GO : 0 2 4 255 5. Gamma Correction 0 0 255 • When dark points of the disc side are adjusted to the "bright" of the output side, the fine parts of the dark portion that normally become hard to see, become an easily discerned image. Memory 1 14.V_Position Control 0 1.Contrast +1 2.Brightnes s 0 • To reset to the default setting, press [RETURN], use [U / V] to select "STD", then press [ENTER]. 0 0 255 • When bright points of the disc side are adjusted to the "dark" of the output side, the fine parts of the bright portion that normally become hard to see, become an easily discerned image. 4) Press [RETURN] repeatedly to exit. Note • This setting is not effective for the picture output from VIDEO OUT and S VIDEO OUT jack. • The setting remains even you turn off the unit. • You cannot adjust the setting during the rapid playback, or when the pure direct is set to "Video Off" or "All Off". • DNR can also be adjusted by pressing on the front panel. (refer to page 7.) List of picture adjustment item/values Item 1. Contrast 2. Brightness 3. Enhancer*1 4. DNR*1 5. Gamma Correction 6. Sharpness Mid*2 7. Sharpness High*1 8. Hue*1 9. White Level 10.Black Level*1 11.Chroma Level 12.Setup Level Description Adjusts the difference between the bright and dark parts of the picture. Adjusts the brightness of the picture. Strengthens the contours of the picture. Reduces the overall level of noise on the picture. Detailed adjustment of the picture's brightness. Adjusts the sharpness of the picture for the medium frequency range. Adjusts the sharpness of the picture for the high frequency range. Adjusts the balance between the green and red. Adjusts the white level. Adjusts the black level. Adjusts the density of the colors. Makes the black parts of the pictures brighter. 13.H_Position Control*1 Adjusts the left/right position. 14.V_Position Control*1 Adjusts the top/bottom position. *1 Effective for the video signal of COMPONENT VIDEO OUT (except for 480i) and HDMI OUT jacks. *2 Not effective for the video signal of HDMI OUT jack. Adjustment range (default) -6 to +6 (0) 0 to +12 (0) 0 to +11 (0) Off to +3 (Off) 16 to 235 (G0=24/G1=32/G2=48/G3=64/ G4=80/G5=96/ G6=128/G7=160/ G8=192/G9=224) -6 to +6 (0) -6 to +6 (0) -6 to +6 (0) -5 to +5 (0) -5 to +5 (0) -6 to +6 (0) 0 IRE : Shows the original picture as recorded. 7.5 IRE : Makes the dark parts brighter. (7.5 IRE) -7 to +7 (0) -7 to +7 (0) 24 ENGLISH
-
 1
1 -
2
-
3
-
4
-
5
-
6
-
7
-
8
-
9
-
10
-
11
-
12
-
13
-
14
-
15
-
16
-
17
-
18
-
19
-
20
-
21
-
 22
22 -
 23
23 -
 24
24 -
 25
25 -
 26
26 -
 27
27 -
 28
28 -
 29
29 -
 30
30 -
 31
31 -
 32
32 -
33
-
34
-
35
-
36
-
37
-
38
-
39
-
40
-
41
-
42
-
43
-
44
 |
 |
