Dewalt D27905H Instruction Manual - Page 6
Assembly Fig. 1-4 - d27905
 |
View all Dewalt D27905H manuals
Add to My Manuals
Save this manual to your list of manuals |
Page 6 highlights
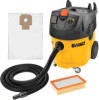
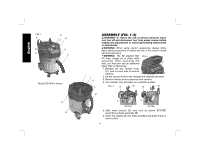
English FIG. 1 A B C D E F G H Model D27904 is shown O N I J K L ASSEMBLY (FIG. 1-4) WARNING: To reduce the risk of serious personal injury, turn tool off and disconnect tool from power source before making any adjustments or removing/installing attachments or accessories. WARNING: When using electric appliances, always follow basic safety precautions to reduce the risk of fire, electric shock and personal injury. WARNING: The flat pleated filter FIG. 2 (P) must always be in place while vacuuming. When vacuuming fine P dust, you may also use an additional paper filter or fleece bag. 1. Release the two canister locks (C), (one on each side of vacuum cleaner). 2. Lift the vacuum lid from the canister and carefully set aside. 3. Remove wheels and accessories from canister. 4. Turn canister over and place on a solid flat surface. FIG. 3 R Q R Q M S S D27904 D27905 5. Slide wand bracket (S) onto tank as shown BEFORE assembling wheels assembly (R). 6. Insert the casters (Q) into holes provided and press firmly to seat in place. 4
-
 1
1 -
 2
2 -
 3
3 -
 4
4 -
 5
5 -
 6
6 -
 7
7 -
 8
8 -
 9
9 -
 10
10 -
 11
11 -
 12
12 -
13
-
14
-
15
-
16
-
17
-
18
-
19
-
20
-
21
-
22
-
23
-
24
-
25
-
26
-
27
-
28
-
29
-
30
-
31
-
32
-
33
-
34
-
35
-
36
-
37
-
38
-
39
-
40
 |
 |
