Dewalt DW443 Instruction Manual - Page 5
Switch, Speed Control Dial, Dust Collection, Replacing Sanding Pad - orbital sander
 |
View all Dewalt DW443 manuals
Add to My Manuals
Save this manual to your list of manuals |
Page 5 highlights
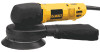
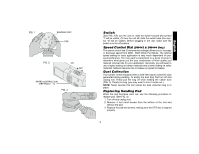
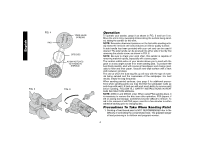
English FIG. 1 SANDING DISC PAD FIG. 2 ON OFF SPEED CONTROL DIAL (SETTINGS 1 - 5) FIG. 3 1 Switch (See FIG. 2)To turn the unit on, slide the switch forward (the symbol "I" will be visible.) To turn the unit off, slide the switch back (the symbol "O" will be visible). Before plugging in the unit, make sure the switch is in the off position. Speed Control Dial (DW443 & DW444 Only) The speed control dial (5 incremental settings) allows you to increase or decrease speed from 4000 - 6800 Orbits Per Minute. The optimal speed setting for each application is very much dependent on personal preference. You may want to experiment on a piece of scrap to determine what gives you the best combination of finish quality and material removal rate for your application. Generally, you will want to use a higher setting on harder materials and a lower setting on softer materials. Material removal rate increases as speed increases. Dust Collection Your sander comes equipped with a cloth filter bag to collect the dust generated during sanding. To empty the dust bag, first turn off and unplug tool. Firmly pull the bag off while holding the rubber boot (FIG. 3). Empty the bag (you may want to turn it inside out.) NOTE: Never operate this tool unless the dust collection bag is in place. Replacing Sanding Pad When the pad becomes worn out, use the following procedure to replace pad. (See FIG. 4) 1. Turn off and unplug tool. 2. Remove 4 torx head screws from the bottom of the tool and remove the pad. 3. Replace the pad and screws, making sure the CFS disc is aligned properly. 3
-
 1
1 -
 2
2 -
 3
3 -
 4
4 -
 5
5 -
 6
6 -
 7
7 -
 8
8 -
 9
9 -
 10
10 -
 11
11 -
12
-
13
-
14
-
15
-
16
-
17
-
18
-
19
-
20
-
21
-
22
-
23
-
24
-
25
-
26
-
27
-
28
-
29
-
30
-
31
-
32
 |
 |
