Dewalt DW443 Instruction Manual - Page 9
Accessories, Three Year Limited Warranty - 6 random orbital sander
 |
View all Dewalt DW443 manuals
Add to My Manuals
Save this manual to your list of manuals |
Page 9 highlights
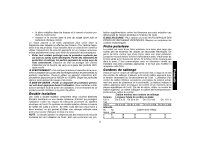
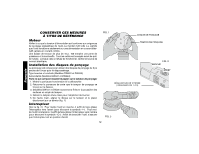
English es the adhesive to flow into all the ridges on the vinyl pad and form a tight bond. If you remove the paper soon after you are finished sanding you don't allow the adhesive to set. If you leave it on for a couple of days the adhesive sets and has more strength than the paper carrier, causing the paper to tear and leaving you with a difficult clean up job. One more disadvantage: If you do small sanding jobs and don't wear out the paper you cannot reuse it and tend to waste more paper. SANDING THE BASIC RULES: Which ones to break and which ones not to. Always start with the coarsest grit first. Don't break this rule. The scratches get smaller as the grit number gets larger and the quality of the finish generally improves. When you change grits be particular about cleaning the surface that you are finishing. An 80 grit particle floating on your work under your 220 grit paper will leave 80 grit scratches. The best way to avoid this is to vacuum the work and then carefully wipe down the work with a tack rag. The random orbit sander action is equally applied across the grain and with the grain. Since the scratch mark is small and random in all directions, the ability of the eye to see a scratch is greatly reduced. Always wear a mask to avoid breathing the dust. NEVER BREAK THIS RULE. We have engineered the tool to collect a majority of the dust created in the sanding process but the tool does not capture it all. To improve the capture rate use a vacuum but ALWAYS wear a dust mask. SOME OTHER HINTS FOR A BETTER FINISH A random orbit sander is much more aggressive than other similarly sized orbital tools so you may want to consider the next finer grit when you start to sand your project. Since the random orbit action makes a short scratch, you may find that a project doesn't require as many grit steps. A lot of professional cabinet makers only use 80, 120, and 150 grit on their work with satisfactory results. If in doubt about how the finish will take to your sanded surface, wipe the surface with some paint thinner. Defects will show up darker than the surrounding wood. Careful inspection of the work prior to the finishing operation may reveal dents. Try to correct these problems by raising the dent (a hot iron and wet rag will do this) or carefully sand a large area around the dent. If you vigorously sand the dent, you may create a cupped surface. When you are satisfied with the sanding job and you have finished sanding with your finest grit, raise the grain by dampening the wood with a wet rag. When the wood has dried and you are ready to apply the finish, resand lightly to take off the wood fibers raised by the water. Vac and tack the surfaces and immediately apply the first coat of finish before the wood gets dirty. WOOD: Some important characteristics of wood Hard grain and soft grain Wood has hard grain and soft grain. Hard grain is typically the product of summer growth and soft grain the product of spring. All sanders will remove more soft grain than hard grain and since the random orbit sander is more aggressive, it will remove it that much more quickly. Extended sanding on a piece of fir for example, will produce a noticeably uneven finish. This is a good reason to correct flaws before sanding. Accessories Recommended accessories for use with your tool are available at extra cost from your local dealer or authorized service center. If you need assistance in locating any accessory for your tool, please contact DEWALT Industrial Tool Co., 701 East Joppa Road, Baltimore, MD 21286, call 1-800-4-DEWALT (1-800-433-9258) or visit our website www.dewalt.com. CAUTION: The use of any other accessory not recommended for use with this tool could be hazardous. Three Year Limited Warranty DEWALT will repair, without charge, any defects due to faulty materials or workmanship for three years from the date of purchase. This 7
-
 1
1 -
2
-
3
-
 4
4 -
 5
5 -
 6
6 -
 7
7 -
 8
8 -
 9
9 -
 10
10 -
 11
11 -
 12
12 -
 13
13 -
 14
14 -
15
-
16
-
17
-
18
-
19
-
20
-
21
-
22
-
23
-
24
-
25
-
26
-
27
-
28
-
29
-
30
-
31
-
32
 |
 |