Dewalt DW443 Instruction Manual - Page 6
Operation, Precautions To Take When Sanding Paint - pad
 |
View all Dewalt DW443 manuals
Add to My Manuals
Save this manual to your list of manuals |
Page 6 highlights
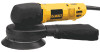
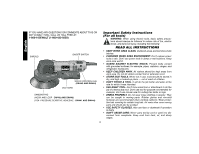
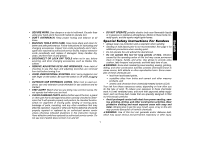
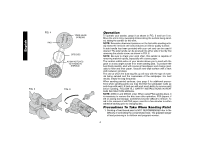
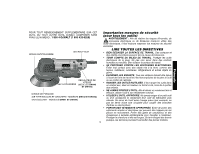
English FIG. 4 PAD FIG. 5 TORX HEAD SCREWS CFS DISC ALIGN NOTCHES TO THOSE IN SHROUD FIG. 6 Operation To operate your sander, grasp it as shown in FIG. 5 and turn it on. Move the unit in long, sweeping strokes along the surface being sanded, letting the sander do the work. NOTE: Excessive downward pressure on the tool while sanding actually slows the removal rate and produces an inferior quality surface. A side handle has been provided with your unit and can be used if desired. The side handle can be screwed into either side of tool by first removing the plastic screw, as shown in FIG. 6. NOTE: Be sure to check your work often, this sander is capable of removing material rapidly, especially with coarse paper. The random orbital action of your sander allows you to sand with the grain or at any angle across it for most sanding jobs. To produce the best finish possible, start with coarse grit sandpaper and change gradually to finer and finer paper. Vacuum and wipe surface with a tack cloth between grit steps. The rate at which the dust bag fills up will vary with the type of material being sanded and the coarseness of the sandpaper. For best results, empty the bag frequently. When sanding painted surfaces, (see page 5 for additional precautions when sanding paint) you may find that the sandpaper loads up and clogs with paint. A heat gun will work much better to remove paint before sanding. FOLLOW ALL SAFETY INSTRUCTIONS IN HEAT GUN INSTRUCTION MANUAL. NOTE: (DW441 and DW444 only): When using PSA sanding discs, it is necessary to remove the disc soon after operation. PSA papers, if left on during tool storage, sometimes become difficult to remove. To aid in the removal of old PSA paper, sand for a few minutes to soften adhesive backing prior to changing disc. Precautions To Take When Sanding Paint 1. Sanding of lead based paint is NOT RECOMMENDED due to the difficulty of controlling the contaminated dust. The greatest danger of lead poisoning is to children and pregnant women. 4
-
 1
1 -
 2
2 -
 3
3 -
 4
4 -
 5
5 -
 6
6 -
 7
7 -
 8
8 -
 9
9 -
 10
10 -
 11
11 -
 12
12 -
13
-
14
-
15
-
16
-
17
-
18
-
19
-
20
-
21
-
22
-
23
-
24
-
25
-
26
-
27
-
28
-
29
-
30
-
31
-
32
 |
 |