Dirt Devil M082476 Revision 1 (4/2003) - Page 6
Assemble, Shoulder, Strap, Installation
 |
View all Dirt Devil M082476 manuals
Add to My Manuals
Save this manual to your list of manuals |
Page 6 highlights
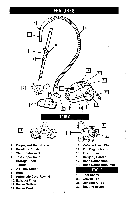
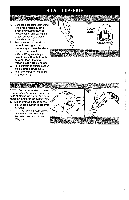
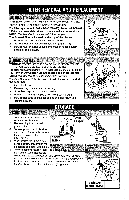
HOW TO ASSEMBLE HOSE INSTALLATION WARNING: TO REDUCE THE RISK OF INJURY - UNPLUG CLEANER BEFORE REMOVING OR INSTALLING HOSE. 1. Insert hose and press until it locks into place (Diagram 1). 0 Diagram -.t Insert hose and press until it Mocks into place. ATTACHMENT INSTALLATION 1. The hose can be used alone or with many combinations of wands and tools. 2. Attachments are packaged sep- arately in the box. To store on the unit, press the tool caddy onto the wand and slide tools into their respective locations (Diagram 1). 3. Choose any of the handy accessories to meet your vari- DiagraMilPress.toolsrinto their location ous cleaning needs. Then sim- onthetool daddy. ply push it firmly onto the hose or wand end until it is secured in place (Diagram 2). 4. To remove the tool, pull apart gently. You may gently rotate the attachment back and forth a lit- tle to make the removal easier. 2. 0:411:0*;-, - - - orMini.d.rO-dditiritill11646eUrett SHOULDER STRAP INSTALLATION SHOULDER STRAP INSTALLATION 1. Put cleaner in a vertical, seated position. 2. Line up tabs of shoulder strap with grooves of cleaner. 3. Press in and up until secure in place (Diagram 1). 4. Cleaner can now be easily car- ried from room to room (Diagram 2). Diagram 1 Press tabs in and up onto the bottom of canister. 2. Diagram 2 The-cleaner can be carried from room to_room. 6
-
 1
1 -
 2
2 -
 3
3 -
 4
4 -
 5
5 -
 6
6 -
 7
7 -
 8
8 -
 9
9 -
 10
10 -
 11
11 -
 12
12 -
13
-
14
-
15
-
16
-
17
-
18
-
19
-
20
-
21
-
22
-
23
-
24
-
25
-
26
-
27
-
28
-
29
-
30
-
31
-
32
 |
 |
