Dirt Devil M110006 Manual - Page 3
Features, How To Assemble
 |
View all Dirt Devil M110006 manuals
Add to My Manuals
Save this manual to your list of manuals |
Page 3 highlights
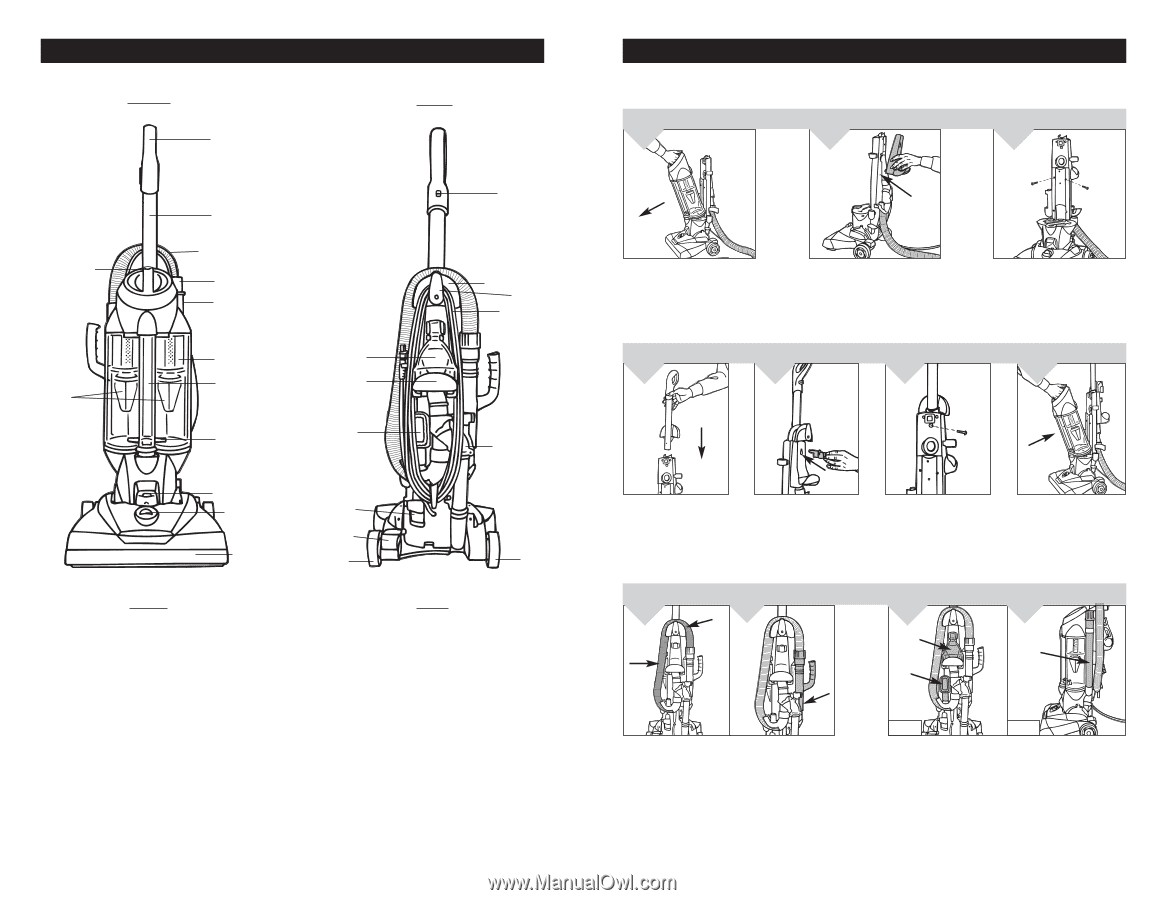
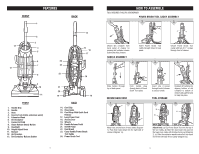
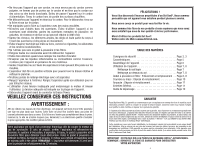
FRONT FEATURES 1 BACK 2 3 13 4 5 6 7 12 8 9 10 11 FRONT 1. Handle Grip 2. Handle 3. Hose 4. Crevice Tool (inside extension wand) 5. Extension Wand 6. Dirt Container 7. Center Dirt Path 8. Clean Release Empty Button 9. Headlight 10. Height Adjust Knob 11. Bumper 12. Air Directors 13. Dirt Container Release Button 14 15 16 17 24 23 22 18 21 20 19 19 BACK 14. Cord Clip 15. Hose Guide 16. Cord Wrap With Quick Cord Release 17. Long Power Cord 18. Access Door 19. Wheels 20. Handle Release Pedal 21. On/Off Pedal 22. Dust Brush 23. Carry Handle/Power Brush Tool Caddy 24. Power Brush Tool 5 HOW TO ASSEMBLE TOOL REQUIRED: PHILLIPS SCREWDRIVER POWER BRUSH TOOL CADDY ASSEMBLY 1. 2. 3. Detach dirt container from back panel of cleaner by pressing dirt container release button and tilting forward. HANDLE ASSEMBLY 1. 2. Insert Power Brush Tool caddy through holes in back panel. 3. Secure Power Brush Tool caddy with two (2) 1" screws through front of cleaner. 4. Slide handle through top of back panel. Push handle plug through back of Power Brush Tool caddy. SECURE BACK HOSE 1. 1a. Insert one (1) screw through front of cleaner to secure handle. TOOL STORAGE 2. a b Reattach dirt container by aligning bottom of dirt container to bottom of cleaner and push forward to snap into place. 2a. c Wrap hose around back of hose caddy (Diagram 1). Push hose wand down into the right side of cleaner (Diagram 1a). BACK SIDE Attach tools: (a) Clip Power Brush Tool onto the top of the tool caddy. (b) Slide the dust brush onto post on the lower tool caddy with bristles facing out (Diagram 2). (c) Slide the extension wand/crevice tool into round slot on the left side of tool caddy (Diagram 2a). 6
-
 1
1 -
 2
2 -
 3
3 -
 4
4 -
 5
5 -
 6
6 -
 7
7 -
 8
8 -
 9
9 -
10
-
11
-
12
-
13
-
14
-
15
-
16
-
17
-
18
 |
 |