Dirt Devil M110006 Manual - Page 6
Lightbulb: Removal & Replacement, General Maintenance, Troubleshooting Guide
 |
View all Dirt Devil M110006 manuals
Add to My Manuals
Save this manual to your list of manuals |
Page 6 highlights
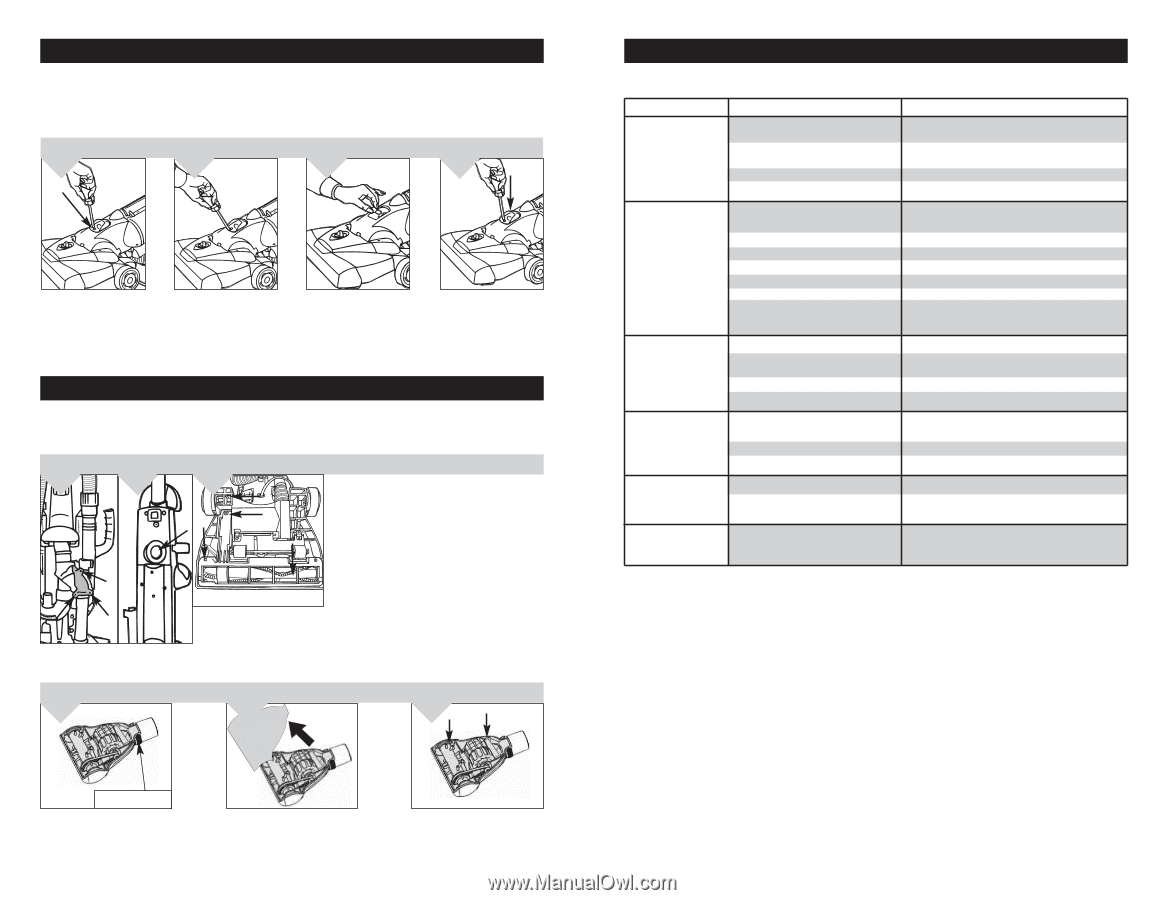
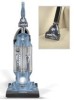
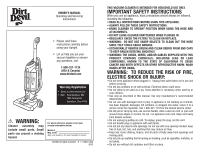
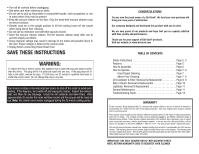
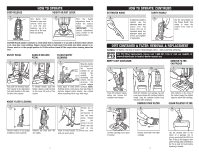
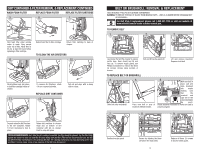
LIGHTBULB: REMOVAL & REPLACEMENT TOOL REQUIRED: FLATHEAD AND PHILLIPS SCREWDRIVER WARNING: TO REDUCE THE RISK OF ELECTRIC SHOCK - UNPLUG CLEANER BEFORE REMOVING OR REPLACING LIGHTBULB. This cleaner uses a common automotive lamp #906, 13.0 volts. For bulb replacement call 1-800-321-1134 or your local auto parts store. 1. 2. 3. 4. Lean cleaner handle back. Remove the one (1) screw. Using the end of a Flathead screwdriver, gently pop open the lens. Remove lens. Pull bulb of of socket. Do NOT twist. Gently push bulb into socket to replace. Snap lens back into place. Secure the headlight lens by replacing the one screw. GENERAL MAINTENANCE WARNING: TO REDUCE THE RISK OF INJURY FROM MOVING PARTS - UNPLUG BEFORE SERVICING. DEBRIS REMOVAL/HOSE DEBRIS REMOVAL/ NOZZLE GUARD 1. 2. 3. DEBRIS REMOVAL/POWER BRUSH TOOL 1. Check to see if dirt container is full; empty if needed. 2. Plug cleaner in and check to see if there is any suction at end of hose. If there is suction at end of hose, move on to Diagram 4. If there is no suction at the end of hose, follow these steps: 1. Unwrap hose from caddy. Remove obstruction. Check access door on back of cleaner (near hose wand). Remove three (3) screws and check for obstruction (Diagram 1). 2. Remove dirt container (Pg. 8) and check dirt container inlet located on cleaner (Diagram 2). 3. Remove nozzle guard (see Diagram 3) by removing the three (3) screws. Remove obstruction. 4. 5. 6. TROUBLESHOOTING GUIDE WARNING: TO REDUCE RISK OF PERSONAL INJURY - UNPLUG CLEANER BEFORE SERVICING PROBLEM Cleaner won't run POSSIBLE REASON 1. Power cord not firmly plugged into outlet. 2. Blown fuse or tripped breaker. 3. Needs service. 4. Thermal Protector activated. POSSIBLE SOLUTION 1. Plug unit in firmly. 2. Check fuse or breaker in home. Replace fuse/reset breaker. 3. Take to service center or call 1-800-321-1134. 4. Allow cleaner to cool - Pg. 3. Cleaner won't pick-up or low suction 1. Dirt container not installed correctly. 2. Dirt container full. 3. Brushroll worn. 4. Broken or worn belt. 5. One or both filters are clogged. 6. Nozzle/dirt passage clogged. 7. Carpet height setting is incorrect. 1. Review dirt container removal and replacement Pg. 8 & 9. 2. Empty dirt container - Pg. 8. 3. Replace brushroll - Pg. 10. 4. Replace belt - Pg. 10. 5. Remove both filters and clean - Pg. 8 & 9. 6. Open access door; remove obstruction - Pg. 11. 7. Set carpet height adjustment to appropriate setting for carpet being cleaned - Pg. 7. Dust escaping from cleaner 1. Dirt container full. 2. Dirt container not installed correctly. 3. Hose not installed correctly. 4. Filter not installed completely. 1. Empty dirt container - Pg. 8. 2. Review dirt container removal & replacement - Pg. 8 & 9. 3. Review hose installation - Pg. 6. 4. Review filter removal & replacement - Pg. 8 & 9. Cleaner tools won't pick-up 1. Hose clogged. 2. Dirt container full. 3. One or both filters are clogged. 1. Remove hose and tools; remove obstruction Pg. 6 & 11. 2. Empty dirt container - Pg. 8. 3. Remove both filters and clean - Pg. 8 & 9. Headlight not working Cleaner is difficult to push or won't move forward 1. Bulb burnt out. 2. Loose electrical wires. 1. Carpet height setting is incorrect. 1. Replace bulb - Pg. 11. 2. Call 1-800-321-1134 for nearest authorized Royal® Dealer. 1. Set carpet height adjust lever to appropriate setting for carpet being cleaned - Pg. 7. ANY OTHER SERVICING SHOULD BE DONE BY AN AUTHORIZED SERVICE REPRESENTATIVE CUSTOMER SERVICE (1-800-321-1134) In the event that further assistance is required, see your Yellow Pages for an authorized Royal® Dealer. Costs of any transportation to and from any place of repair are to be paid by the owner. The service parts used in this unit are easily replaced and readily available from an authorized Royal® Dealer or retailer. Always identify your cleaner by the model number and manufacturing code when requesting information or ordering replacement parts. (The model number appears on the bottom of the cleaner.) LOCKING RING Rotate locking ring 180˚ and turn Power Brush Tool over. Pivot lower housing and remove clog. To reassemble, be sure tabs are engaged. Pivot the lower housing closed. 11 12
-
 1
1 -
 2
2 -
 3
3 -
 4
4 -
 5
5 -
 6
6 -
 7
7 -
 8
8 -
 9
9 -
 10
10 -
 11
11 -
 12
12 -
13
-
14
-
15
-
16
-
17
-
18
 |
 |