Dirt Devil M110006 Manual - Page 5
Dirt Container & Filter Removal & Replacement: Continued, Belt Or Brushroll: Removal &
 |
View all Dirt Devil M110006 manuals
Add to My Manuals
Save this manual to your list of manuals |
Page 5 highlights
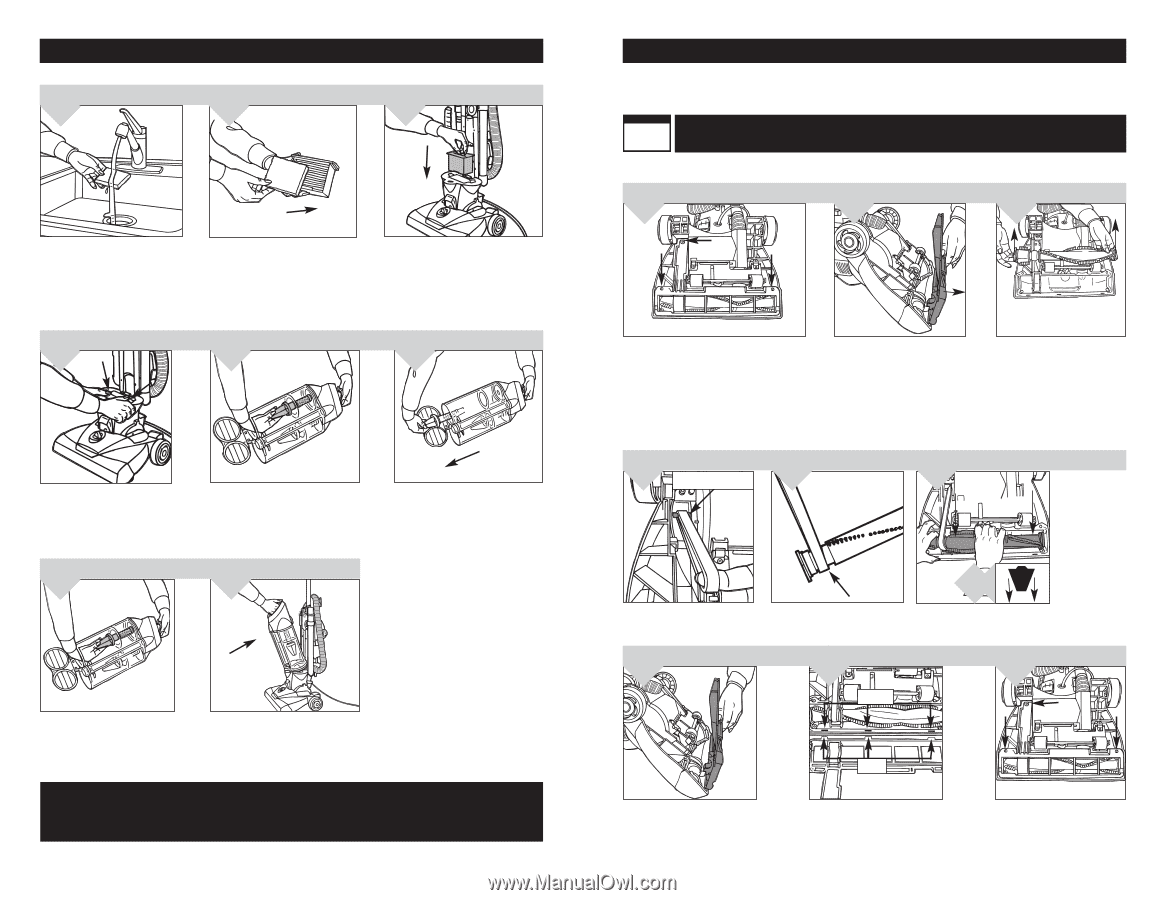
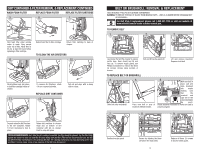
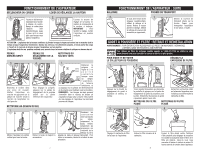
DIRT CONTAINER & FILTER REMOVAL & REPLACEMENT: CONTINUED WASH FOAM FILTER REPLACE FOAM FILTER REPLACE FILTER CARTRIDGE 5. 6. 7. Hold foam filter under running water to wash. Ring excess water out of filter. Allow filter to dry for at least 24 hours before replacing in filter cartridge. 8. Return foam filter to filter cartridge. Return filter cartridge to base of cleaner. TO CLEAN THE AIR DIRECTORS 9. 10. Click buttons back into place to lock filter cartridge in base of cleaner. 11. To remove Air Directors, rotate 1/4 turn counterclockwise. Pull out and wipe with a damp cloth to clean. REPLACE DIRT CONTAINER 12. Dry and return the Air Directors to the dirt container. Rotate 1/4 turn clockwise to lock in place. Return dirt container to cleaner. Align slot on bottom of dirt container with tab on cleaner. Push to snap into place. *REGULAR MAINTENANCE: Each time the dirt container is emptied, the filter should be cleaned. Tap the filter firmly against the inside of a trash can until the dirt stops falling from the filter. (Filter will be discolored after use, this will not affect the filter's performance.) Do not brush the filter. The cleaning instructions may vary depending on the dirt conditions. In some cases, more or less cleaning of the filter may be required. 9 BELT OR BRUSHROLL: REMOVAL & REPLACEMENT TOOL REQUIRED: PHILLIPS OR FLATHEAD SCREWDRIVER WARNING: TO REDUCE THE RISK OF INJURY FROM MOVING PARTS - UNPLUG CLEANER BEFORE CHANGING BELT OR BRUSHROLL. 5BELTSTYLE For Belt Style 5 replacement, please call 1-800-321-1134 or visit our website at www.dirtdevil.com to locate a dealer nearest you. TO REMOVE BELT 1. 2. 3. Lay cleaner flat and flip cleaner to expose nozzle base. Base should lay flat and face up. To remove nozzle guard, use Phillips screwdriver to remove the three (3) screws. Arrows show location of screws. Pull and lift nozzle guard off. Lift and remove brushroll. Dispose of old belt. TO REPLACE BELT OR BRUSHROLL 4. MOTOR SHAFT Slide belt onto motorshaft. 5. Place new belt in area of brushroll without bristles. 6. With new belt in place, pull and slide brushroll into nozzle making sure that the brushroll end 6a. caps are in the correct orientation (6a inset). Rotate brushroll manually to make sure belt is properly aligned. 7. 8. 9. SLOTS Reattach nozzle guard. TABS Secure by aligning the three (3) tabs in the base slots. 10 Replace all three (3) screws to secure nozzle guard.
-
 1
1 -
 2
2 -
 3
3 -
 4
4 -
 5
5 -
 6
6 -
 7
7 -
 8
8 -
 9
9 -
 10
10 -
 11
11 -
12
-
13
-
14
-
15
-
16
-
17
-
18
 |
 |