Dirt Devil UD40140 Revision 1 (1/2006) - Page 3
Features, How To Assemble - filters
 |
View all Dirt Devil UD40140 manuals
Add to My Manuals
Save this manual to your list of manuals |
Page 3 highlights
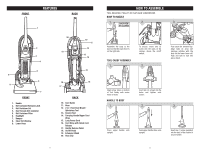
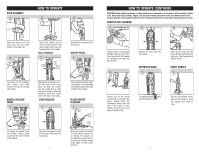
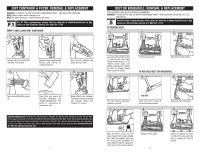
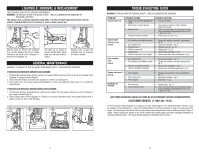
FEATURES FRONT BACK 1 2 3 4 5 9 6 8 7 FRONT 1. Handle 2. Dirt Container Release Latch 3. Dirt Container Lid 4. See Through Dirt Container 5. Dirt Container Filter 6. Headlight 7. Bumper 8. Clear Dirt Window 9. Lower Hose 20 19 10 11 12 13 14 15 18 16 17 BACK 10. Cord Guide 11. Hose 12. 2-in-1 Tool-Dust Brush / Upholstery Tool 13. Crevice Tool 14. Carrying Handle/Upper Cord Wrap 15. Long Power Cord 16. Cord Wrap with Quick Cord Release 17. Handle Release Pedal 18. On/Off Pedal 19. Extension Wand 20. Hose Clip 5 HOW TO ASSEMBLE TOOL REQUIRED: PHILLIPS OR FLAT HEAD SCREWDRIVER BODY TO NOZZLE 1. BACK VIEW 2. 3. OF CLEANER Assemble the body to the base so that the lower hose is on the right side. TOOL CADDY ASSEMBLY 1. To secure, insert one (1) screw into the back of the cleaner, above the on/off switch. 2. Push back dirt window flap. Align tabs on clear dirt passage window with the slots on the lower hose cuff. Push and turn to lock into place (inset). Align screw holes on bottom of Tool Caddy with screw holes on body. Insert two (2) screws into the holes and tighten until secure. HANDLE TO BODY 1. 2. 3. Place upper handle onto upright. Push upper handle down onto upright. Insert one (1) screw (supplied) into the back of the cleaner to secure handle. 6
-
 1
1 -
 2
2 -
 3
3 -
 4
4 -
 5
5 -
 6
6 -
 7
7 -
 8
8 -
 9
9 -
10
-
11
-
12
-
13
-
14
-
15
-
16
-
17
-
18
 |
 |
