Dirt Devil UD40140 Revision 1 (1/2006) - Page 5
Dirt Container & Filter: Removal & Replacement, Belt Or Brushroll: Removal & Replacement
 |
View all Dirt Devil UD40140 manuals
Add to My Manuals
Save this manual to your list of manuals |
Page 5 highlights
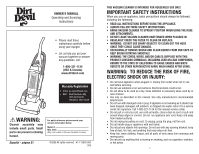
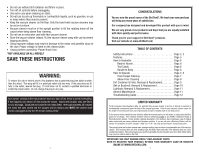
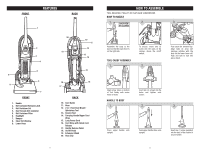
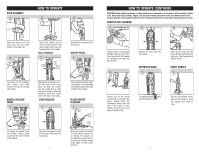
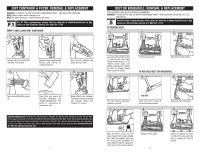
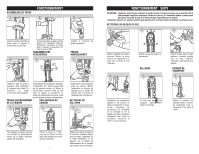
DIRT CONTAINER & FILTER: REMOVAL & REPLACEMENT WARNING: TO REDUCE THE RISK OF INJURY FROM MOVING PARTS - UNPLUG BEFORE SERVICING. NOTE: Unplug cleaner before changing filter. NOTE: For best performance, replace pleated filter yearly. FILTER TYPE F1 For F1 filter replacement, please visit our website at www.dirtdevil.com to buy online or call customer service at 1-800-321-1134. EMPTY AND CLEAN DIRT CONTAINER 1. 2. 3. BELT OR BRUSHROLL: REMOVAL & REPLACEMENT TOOL REQUIRED: PHILLIPS OR FLATHEAD SCREWDRIVER WARNING: TO REDUCE THE RISK OF INJURY FROM MOVING PARTS - UNPLUG BEFORE CHANGING BELT OR BRUSHROLL. BELT STYLE 5 For Belt Style 5 replacements, please visit our website at www.dirtdevil.com to buy online or call customer service at 1-800-321-1134. TO REMOVE BELT 1. 2. 3. Depress latch to remove dirt container from cleaner. 4. Remove lid by grasping both handles and turning lid counterclockwise. 5. Hold the dirt container and grasp the top of filter. 6. Lay cleaner flat and flip cleaner to expose nozzle base. Base should lay flat and face up. To remove nozzle guard, use Phillips screwdriver to remove the four (4) screws. Arrows show location of screws. 4. Lift nozzle guard off. Slide belt off motor shaft. TO REPLACE BELT OR BRUSHROLL 5. 6. Twist and pull the filter up and out. Clean filter and empty dirt container completely. See "Regular Maintenance" note below for instructions on cleaning the filter. Return filter to dirt container. Push filter into place to prevent dirt leakage. Return dirt container to cleaner. *Regular Maintenance: Each time the dirt container is emptied, the pleated filter should be cleaned. Tap the filter firmly against the inside of a trash can until the dirt stops falling from the filter. (Filter will be discolored after use, this will not affect the filter's performance.) Do not brush the filter. The cleaning instructions may vary depending on the dirt conditions. In some cases, more or less cleaning of the filter may be required. It is recommended that the filter be replaced once per year. 9 Lift and remove brushroll. Dispose of old belt. 7. END CAP Place new belt in area of brushroll without bristles. 8. Slide belt onto motorshaft. 9. 7a. With new belt in place, pull and slide brushroll into nozzle making sure that the brushroll end caps are in the correct orientation (7a inset). Rotate brushroll manually to make sure belt is properly aligned. Reattach nozzle guard. 10 TAB TAB TAB Secure by aligning the three (3) tabs in the base slots. Be sure to replace all four (4) screws.
-
 1
1 -
 2
2 -
 3
3 -
 4
4 -
 5
5 -
 6
6 -
 7
7 -
 8
8 -
 9
9 -
 10
10 -
 11
11 -
12
-
13
-
14
-
15
-
16
-
17
-
18
 |
 |
