Edimax BR-6624 Manual - Page 14
Settings - LAN & DHCP - how to configure
 |
View all Edimax BR-6624 manuals
Add to My Manuals
Save this manual to your list of manuals |
Page 14 highlights
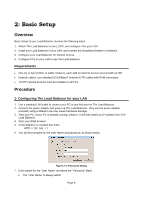
9. Select LAN & DHCP from the menu. You will see a screen like the example below. Figure 2-3: LAN & DHCP 10. Ensure these settings are suitable for your LAN: • The default settings are suitable for many situations. • See the following table for details of each setting. 11. Save your data, then go to Step 2, Installing The Load Balancer in your LAN. Settings - LAN & DHCP IP Address Subnet Mask DHCP Server Configuration IP address for The Load Balancer, as seen from the local LAN. Use the default value unless the address is already in use or your LAN is using a different IP address range. In the latter case, enter an unused IP Address from within the range used by your LAN. The default value 255.255.255.0 is standard for small (class "C") networks. For other networks, use the Subnet Mask for the LAN segment to which The Load Balancer is attached (the same value as the PCs on that LAN segment). • DHCP Server Setup - If Enabled, The Load Balancer will allocate IP Addresses to PCs (DHCP clients) on your LAN when they start up. The default and recommended value is "Enable". (Windows systems, by default, act as DHCP clients. This setting is called Obtain an IP address automatically.) Page 10
-
 1
1 -
2
-
3
-
4
-
5
-
6
-
7
-
8
-
 9
9 -
 10
10 -
 11
11 -
 12
12 -
 13
13 -
 14
14 -
 15
15 -
 16
16 -
 17
17 -
 18
18 -
 19
19 -
20
-
21
-
22
-
23
-
24
-
25
-
26
-
27
-
28
-
29
-
30
-
31
-
32
-
33
-
34
-
35
-
36
-
37
-
38
-
39
-
40
-
41
-
42
-
43
-
44
-
45
-
46
-
47
-
48
-
49
-
50
-
51
-
52
-
53
-
54
-
55
-
56
-
57
-
58
-
59
-
60
-
61
-
62
-
63
-
64
-
65
-
66
-
67
-
68
-
69
-
70
-
71
-
72
-
73
-
74
-
75
-
76
-
77
-
78
-
79
-
80
-
81
 |
 |
