Epson Artisan 725 Quick Guide - Page 43
Setting Up Additional Computers, Entering Your SSID Manually - user manual
 |
View all Epson Artisan 725 manuals
Add to My Manuals
Save this manual to your list of manuals |
Page 43 highlights
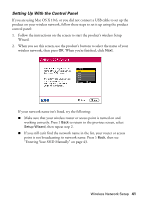
Entering Your SSID Manually If your network doesn't broadcast its name (SSID), follow these steps to enter it: 1. From the Select SSID screen on the product control panel, press u or d to select Other SSIDs, then press OK. 2. Use the arrow buttons on the control panel to enter your network name. Press u, d, l, or r to highlight a letter or function button on the screen (shown below), then press OK to select it. Use the function buttons to select uppercase (AB12), lowercase (ab12), symbols (!#%@), or spaces ( ), and to delete characters ( ). Important: Network names are case-sensitive. Be sure to enter uppercase letters (ABC) or lowercase letters (abc) correctly. Function buttons 3. When you're done entering your network name, select Done and press OK. 4. Continue with step 3 on page 42 to enter your network password. Setting Up Additional Computers 1. Make sure your product is turned on. 2. Insert the product software CD. 3. Windows 7 and Windows Vista: If you see the AutoPlay window, click Run Setup.exe. When you see the User Account Control screen, click Yes or Continue. Windows XP: When you see the Software Installation screen, continue with step 4. Mac OS X: Double-click the Epson icon. Wireless Network Setup 43
-
 1
1 -
2
-
3
-
4
-
5
-
6
-
7
-
8
-
9
-
10
-
11
-
12
-
13
-
14
-
15
-
16
-
17
-
18
-
19
-
20
-
21
-
22
-
23
-
24
-
25
-
26
-
27
-
28
-
29
-
30
-
31
-
32
-
33
-
34
-
35
-
36
-
37
-
 38
38 -
 39
39 -
 40
40 -
 41
41 -
 42
42 -
 43
43 -
 44
44 -
 45
45 -
 46
46 -
 47
47 -
 48
48 -
49
-
50
-
51
-
52
-
53
-
54
-
55
-
56
-
57
-
58
-
59
-
60
-
61
-
62
-
63
-
64
 |
 |
