Epson C11C501061 Product Information Guide - Page 5
Installing the First Ink Cartridges, EPSON Stylus Photo 900
 |
UPC - 010343846043
View all Epson C11C501061 manuals
Add to My Manuals
Save this manual to your list of manuals |
Page 5 highlights
EPSON Stylus Photo 900 Installing the First Ink Cartridges 1. Open the output tray and the printer cover. 4. Lower each cartridge into the holder. Make sure the tabs rest on the hooks in the back. 2. Lift up both ink cartridge clamps. You must install both cartridges or the printer won't work. 5. Press down on the ink cartridge clamps until they click into place. 3. Unwrap the ink cartridges and remove the yellow tape. 6. Close the printer cover and press the ink button. The green power light flashes as the printer charges ink for about 2 minutes. Don't turn off the printer or interrupt charging while the power light is flashing or you'll waste ink. Don't touch the green part 4 - EPSON Stylus Photo 900 5/03
-
 1
1 -
 2
2 -
 3
3 -
 4
4 -
 5
5 -
 6
6 -
 7
7 -
 8
8 -
 9
9 -
 10
10 -
 11
11 -
12
-
13
-
14
-
15
 |
 |

EPSON Stylus Photo 900
4 -
EPSON Stylus Photo 900
5/03
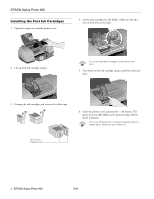
Installing the First Ink Cartridges
1.
Open the output tray and the printer cover.
2.
Lift up both ink cartridge clamps.
3.
Unwrap the ink cartridges and remove the yellow tape.
4.
Lower each cartridge into the holder. Make sure the tabs
rest on the hooks in the back.
You must install both cartridges or the printer won’t
work.
5.
Press down on the ink cartridge clamps until they click into
place.
6.
Close the printer cover and press the
ink button. The
green
power light flashes as the printer charges ink for
about 2 minutes.
Don’t turn off the printer or interrupt charging while the
power light is flashing or you’ll waste ink.
Don’t touch
the green part