Epson C11C501061 Product Information Guide - Page 9
Loading and Printing on Card Stock or Matte Board
 |
UPC - 010343846043
View all Epson C11C501061 manuals
Add to My Manuals
Save this manual to your list of manuals |
Page 9 highlights
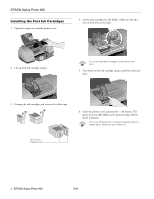
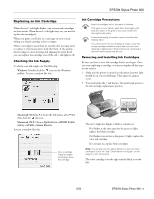
EPSON Stylus Photo 900 6. Install the roll paper holders on the printer. Insert the left holder into the far left slot, then insert the other holder into the appropriate slot on the right (either the 4-inch slot as shown, or the 8.3-inch slot further on the right). 7. Pull out approximately six inches of paper and insert it into the sheet feeder. Then slide the left edge guide against the paper (but not too tightly). 8. Hold the paper in place by the edges and press the roll paper button until the printer feeds the paper automatically. Loading and Printing on Card Stock or Matte Board You can use the manual feed slot in the back of the printer to print on white card stock or matte board up to 1.3 mm (0.051 inch or 51 mil) thick, in the following sizes: letter, legal, or A4 size. Before you start, remove the paper support. Then turn the printer on. (The printer must be on to load card stock correctly.) 1. Push in the output tray extension, but leave the tray open. 2. Set the paper thickness lever to the position. The paper light begins flashing rapidly. 9. To verify that the paper is loaded straight, open the printer cover and look into the printer. If the paper is crooked, press the roll paper button and hold it for three seconds to back the paper all the way out. 3. Slide the edge guide to the right to make room for the card stock. Then turn the roll paper holder knobs to roll up the paper. Press the roll paper button to clear the paper out error. Repeat steps 7 through 9 to reload the paper. 4. Open the printer cover and place a sheet of card stock against the left side of the manual feed slot, with the side you want to print on facing up. 8 - EPSON Stylus Photo 900 5/03
-
 1
1 -
2
-
3
-
 4
4 -
 5
5 -
 6
6 -
 7
7 -
 8
8 -
 9
9 -
 10
10 -
 11
11 -
 12
12 -
 13
13 -
 14
14 -
15
 |
 |
