Epson CX5400 Product Information Guide - Page 5
Selecting the Correct Media Type, Placing Your Original Document, Stand-alone Copying, Basic Copying - won t print
 |
UPC - 010343848412
View all Epson CX5400 manuals
Add to My Manuals
Save this manual to your list of manuals |
Page 5 highlights
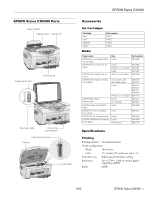
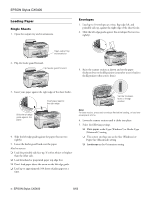
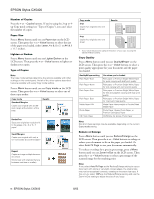
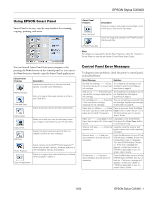
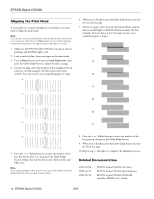
EPSON Stylus CX5400 Selecting the Correct Media Type Select the Type (Windows) or Media Type (Macintosh) setting according to these guidelines: For this paper Plain paper sheets or envelopes EPSON Premium Bright White Paper EPSON Photo Quality Ink Jet Paper EPSON Photo Quality Ink Jet Cards EPSON Matte Paper Heavyweight EPSON Double-Sided Matte Paper EPSON Photo Paper EPSON Glossy Photo Paper EPSON Ink Jet Transparencies EPSON DURABrite Ink Glossy Photo Paper Select this Type or Media Type setting Plain paper Bright White Paper Matte Paper - Heavyweight Glossy Photo Paper Ink Jet Transparencies DURABrite Ink Glossy Photo Paper Placing Your Original Document 1. Open the scanner lid. 2. Place your document face-down on the glass, in the corner shown below. Move your document about 1/8 inch from the top and side edge so your entire document is scanned. Stand-alone Copying Basic Copying 1. Place your document face-down on the glass, as shown in the previous section. 2. The default copy settings are displayed on the control panel. Change any necessary copy settings, as described in "Changing Copy Settings" below. 3. Press the Color Copy button (for color copies) or B&W Copy button (for black and white copies). Your document is scanned and then printed. Note: Your copied image size may not be the exact same size as your original. If you're using the 2-up or 4-up Copy Mode setting (see "Type of Copies" on page 6), repeat these steps for your second page. Changing Copy Settings The current copy settings are shown on the LCD screen. You can change copy settings using the control panel, as described below. Current settings are shown here 3. Close the scanner lid. Note: If you place your document against the guides, the edges next to the guides won't be scanned. If you need to scan a thick document, such as a book, you can remove the scanner lid to scan. Gently press down the original to keep it flat on the document table. Be sure to replace the scanner id when you're finished. Reset button Menu Copies/Value Stop buttons buttons (+ and -) button When you finish changing a setting, press the Stop button. Note: To clear a setting, press the Reset button. To clear all the setting changes you've made, press and hold the Reset button for at least 3 seconds. If you'll be changing the Copy mode setting (as described in "Type of Copies" on page 6), select your Copy mode before selecting any other copy settings. 8/03 EPSON Stylus CX5400 - 5
-
 1
1 -
 2
2 -
 3
3 -
 4
4 -
 5
5 -
 6
6 -
 7
7 -
 8
8 -
 9
9 -
 10
10
 |
 |