Epson CX5400 Product Information Guide - Page 8
Cleaning the Print Head, Replacing an Ink Cartridge, Removing and Installing Ink Cartridges
 |
UPC - 010343848412
View all Epson CX5400 manuals
Add to My Manuals
Save this manual to your list of manuals |
Page 8 highlights
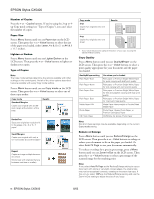
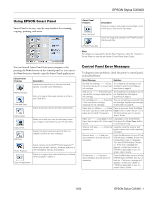
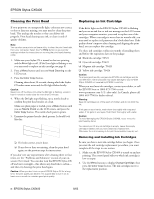
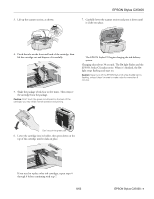
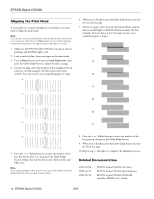
EPSON Stylus CX5400 Cleaning the Print Head If your printouts are unexpectedly light, colors are not correct, or dots or lines are missing, you may need to clean the print head. This unclogs the nozzles so they can deliver ink properly. Print head cleaning uses ink, so clean it only if quality declines. Note: You can also use a printer software utility to clean the print head right from your computer. Select the ? or Help button on your printer settings window for instructions on running the print head cleaning utility. 1. Make sure your Stylus CX is turned on but not printing, and the Error light is off. (If the Error light is flashing or on, you may need to replace an ink cartridge; see page 8) 2. Press a Menu button until you see Head Cleaning on the LCD screen. 3. Press the Color Copy button. Cleaning takes about 30 seconds, during which the Stylus CX makes some noise and the On light flashes briefly. Caution: Never turn off the Stylus CX while the On light is flashing, unless it hasn't moved or made noise for more than 5 minutes. 4. When the On light stops flashing, run a nozzle check to confirm the print head nozzles are clean. Make sure plain paper is loaded, press a Menu button until you see Nozzle Check on the LCD screen, and press the Color Copy button. The nozzle check pattern prints. 5. Examine the printed nozzle check pattern. It should look like this: ❏ If it looks correct, you're done. ❏ If any dots or lines are missing, clean the print head again; see the previous steps for instructions. If you don't see any improvement after cleaning three or four times, see the "Problems and Solutions" section of your onscreen User's Guide. You can also turn the EPSON Stylus CX off and wait overnight-this allows any dried ink to soften- and then try cleaning the print head again. Caution: When you don't turn on your EPSON Stylus CX for a long time, the print quality can decline. It's a good idea to turn it on at least once a month to maintain good print quality. Replacing an Ink Cartridge If the Error light on the EPSON Stylus CX5400 is flashing and you see an ink low or ink out message on the LCD screen and your computer monitor, you need to replace one of the cartridges. When a cartridge is more than six months old, you may need to replace it if printouts don't look their best. If the quality doesn't improve after cleaning and aligning the print head, you can replace the cartridge. Use these ink cartridges within six months of installing them and before the expiration date on the package: ❏ Black ink cartridge: T0321 ❏ Cyan ink cartridge: T0422 ❏ Magenta ink cartridge: T0423 ❏ Yellow ink cartridge: T0424 Caution: To ensure good results, use genuine EPSON ink cartridges and do not refill them. Other products may cause damage to your EPSON Stylus CX5400 not covered by EPSON's warranty. When you need new ink cartridges, contact your dealer, or call the EPSON Store at (800) 873-7766 or visit www.epsonstore.com (U.S. sales only). In Canada, please call (800) 463-7766 for dealer referral. Warning: Keep ink cartridges out of the reach of children and do not drink the ink. If ink gets on your hands, wash them thoroughly with soap and water. If ink gets in your eyes, flush them thoroughly with water. Caution: To avoid damaging the EPSON Stylus CX5400, never move the print head by hand. You cannot print if any ink cartridge is empty. Leave the empty cartridge installed until you have obtained a replacement. Otherwise the ink remaining in the print head nozzles may dry out. Removing and Installing Ink Cartridges Be sure you have a new ink cartridge before you begin. Once you start the ink cartridge replacement procedure, you must complete all the steps in one session. 1. Make sure the EPSON Stylus CX5400 is turned on and not printing. The control panel tells you which ink cartridge is low or empty. 2. Use the Menu buttons to display Change Cartridge, then press the Color Copy button. The ink cartridges move to the replacement position. 8 - EPSON Stylus CX5400 8/03
-
 1
1 -
2
-
 3
3 -
 4
4 -
 5
5 -
 6
6 -
 7
7 -
 8
8 -
 9
9 -
 10
10
 |
 |