Epson CX5400 Start Here Card
Epson CX5400 - Stylus Color Inkjet Manual
 |
UPC - 010343848412
View all Epson CX5400 manuals
Add to My Manuals
Save this manual to your list of manuals |
Epson CX5400 manual content summary:
- Epson CX5400 | Start Here Card - Page 1
have all the parts shown here. If any parts are missing, contact EPSON as described on the back of this sheet. 4046293-00 CPD-16736 EPSON Stylus CX5400 Software CD-ROM Quick Reference Guide Paper support USB cable Ink cartridges 2 Remove all tape, as shown. Feeder guard Remove tape and open - Epson CX5400 | Start Here Card - Page 2
the transportation lock to the unlocked position. Caution: Make sure you unlock the scanner, or it won't work. 3 Close the scanner lid. 3 Attach the Parts 1 Set the feeder guard into its two slots at the back of the Stylus CX. 2 Insert the paper support into its two grooves behind the feeder guard. - Epson CX5400 | Start Here Card - Page 3
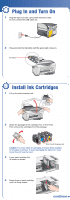
On 1 Plug the Stylus CX into a grounded electrical outlet. Do not connect the USB cable yet. 2 Press and hold the On button until the green light comes on. On button On Scan Error Reset Recall Reset all(3sec) Save(3sec) 5 Install Ink Cartridges 1 Lift up the entire scanner unit. 2 Shake the - Epson CX5400 | Start Here Card - Page 4
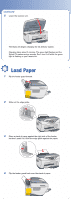
. Charging takes about 2 minutes. The green light flashes and the Stylus CX makes various sounds. Don't turn it off while the green light is flashing or you'll waste ink. 6 Load Paper 1 Flip the feeder guard forward. 2 Slide out the edge guide. 3 Place a stack of paper against the right side of the - Epson CX5400 | Start Here Card - Page 5
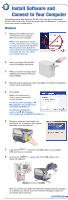
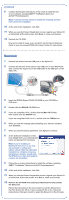
agreement, then click Agree. The Software Installation screen opens automatically. 5 Click Install. Note: If the install screen doesn't open automatically, do the following: For Windows XP: click Start > My Computer. Then double-click the EPSON CD-ROM icon. For Windows 2000/Me/98: double-click My - Epson CX5400 | Start Here Card - Page 6
installation, click Exit. 11 When you see the Product Registration screen, register your Stylus CX as instructed. At the last screen, click Done or close your browser. 12 Remove the CD-ROM. Now you're ready to copy, scan, and print. See the Quick Reference Guide or your on-screen EPSON Information - Epson CX5400 | Start Here Card - Page 7
the lid to unlock the scanner. See section 2. Make sure the ink cartridges are pushed all the way down. Make sure you're using the USB cable that came with your Stylus CX. Try connecting it to a different USB port on your computer. Make sure your EPSON Stylus CX5400 software is installed correctly. - Epson CX5400 | Start Here Card - Page 8
look for answers: EPSON Stylus CX 5400 Quick Reference Guide On-screen EPSON Information Center Double-click the EPSON Information Center icon on your desktop to view Print Show animations and your EPSON User's Guide. On-screen Help for EPSON Smart Panel™, ArcSoft™ PhotoImpression™, EPSON Scan, and
-
 1
1 -
 2
2 -
 3
3 -
 4
4 -
 5
5 -
 6
6 -
 7
7 -
8
 |
 |

EPSON Stylus
®
CX5400
Start Here
1
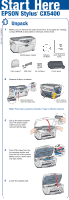
Make sure you have all the parts shown here. If any parts are missing,
contact EPSON as described on the back of this sheet.
2
Remove all tape, as shown.
Note:
There may be packing materials or tape in different locations.
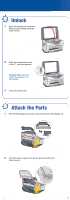
3
Lift up the entire scanner
unit. If it doesn’t open,
make sure you have
removed all the tape.
4
Peel off the tape from the
ink cartridge holder and
from the top of the printer.
Make sure you don’t leave
any tape inside.
5
Lower the scanner unit.
Unpack
1
Paper support
USB cable
Software
CD-ROM
Quick Reference
Guide
EPSON Stylus CX5400
Ink cartridges
Feeder guard
Don’t remove
this sticker yet
4046293-00
CPD-16736
Remove tape and
open the output tray