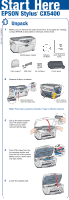
Epson CX5400 Start Here Card - Page 2
Unlock, Attach the Parts - stylus scanner
 |
UPC - 010343848412
View all Epson CX5400 manuals
Add to My Manuals
Save this manual to your list of manuals |
Page 2 highlights
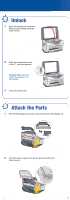
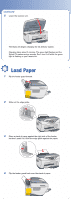
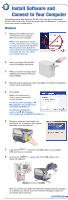
2 Unlock 1 Open the scanner lid, as shown. Remove any packing materials under the lid. 2 Slide the transportation lock to the unlocked position. Caution: Make sure you unlock the scanner, or it won't work. 3 Close the scanner lid. 3 Attach the Parts 1 Set the feeder guard into its two slots at the back of the Stylus CX. 2 Insert the paper support into its two grooves behind the feeder guard.
-
 1
1 -
 2
2 -
 3
3 -
 4
4 -
 5
5 -
 6
6 -
 7
7 -
 8
8
 |
 |

1
Set the feeder guard into its two slots at the back of the Stylus CX.
2
Insert the paper support into its two grooves behind the
feeder guard.
1
Open the scanner lid, as shown.
Remove any packing materials
under the lid.
2
Slide the transportation lock
to the
unlocked position.
Caution:
Make sure you
unlock the scanner, or it
won’t work.
3
Close the scanner lid.
Unlock
2
2
Attach the Parts
3