Epson CX6400 Product Information Guide - Page 5
Loading Paper, Single Sheets, Selecting the Correct Paper Type, Placing Your Original Document - stylus all in one printer
 |
UPC - 013438468694
View all Epson CX6400 manuals
Add to My Manuals
Save this manual to your list of manuals |
Page 5 highlights
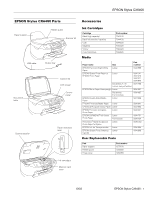
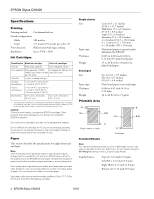
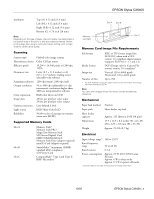
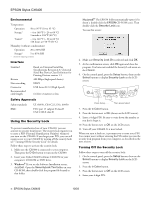
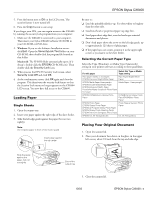
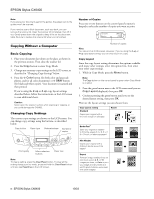
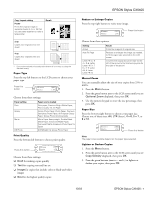
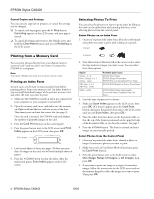
EPSON Stylus CX6400 5. Press the button next to OK on the LCD screen. The security feature is now turned off. 6. Press the Copy button to exit setup. If you forget your PIN, you can regain access to the CX6400 by running the security lock program from your computer: 1. Make sure the CX6400 is connected to your computer. Then insert your Stylus CX6400 software CD-ROM in your CD-ROM or DVD drive. 2. Windows: If you see the Software Installation screen, click Exit. Open the SecurityLock Tool folder on your CD-ROM, then double-click the program file located in that folder. Macintosh: The EPSON folder automatically opens (if it doesn't, double-click the EPSON CD-ROM icon). Then double-click the Security Lock icon. 3. When you see the EPSON Security Lock screen, select Security Lock Off and click OK. 4. At the confirmation screen, click OK again and close the program. This deactivates the security lock feature so that the Security Lock menu no longer appears on the CX6400 LCD screen. You now have full access to the CX6400. Loading Paper Single Sheets 1. Open the output tray. 2. Insert your paper against the right edge of the sheet feeder. 3. Slide the left edge guide against the paper (but not too tightly). Note: Do not place paper in front of the feeder guard. Insert paper against the right edge Be sure to: ❏ Load the printable side face-up. It's often whiter or brighter than the other side. ❏ Load letterhead or preprinted paper top edge first. ❏ Load paper short-edge first, even for landscape-oriented documents and photos. ❏ Don't load paper above the arrow on the left edge guide, up to approximately 125 sheets of plain paper. ❏ If the paper has a cut corner, position it in the upper right corner as you load it in the sheet feeder. Selecting the Correct Paper Type Select the Type (Windows) or Media Type (Macintosh) setting in your printer software according to these guidelines: For this paper Select this Type or Media Type setting Plain paper sheets or envelopes EPSON Premium Bright White Paper Plain Paper/ Bright White Paper EPSON Matte Paper Heavyweight Matte Paper - Heavyweight EPSON Double-Sided Matte Paper EPSON Enhanced Matte Paper PremierArt Matte Scrapbook Photo Paper for Epson EPSON DURABrite Ink Glossy Photo Paper DURABrite Ink Glossy Photo Paper/DURABrite Photo Paper EPSON Photo Paper Photo Papers/ Generic Photo EPSON Glossy Photo Paper Paper EPSON All-Purpose Glossy Photo Paper EPSON Glossy Photo Greeting Cards EPSON Premium Semigloss Photo Paper EPSON Ink Jet Transparencies Ink Jet Transparency Placing Your Original Document 1. Open the scanner lid. 2. Place your document face-down on the glass, in the upper left corner, about 1/8 inch from the top and side edge. Slide the guide against the paper, but not too tightly Extend the output tray 3. Close the scanner lid. 10/03 EPSON Stylus CX6400 - 5
-
 1
1 -
 2
2 -
 3
3 -
 4
4 -
 5
5 -
 6
6 -
 7
7 -
 8
8 -
 9
9 -
 10
10 -
 11
11 -
12
-
13
 |
 |