Epson Expression 10000XL - Photo User Manual - Page 60
Scanning Your Document, In Office Mode, set the Document Size setting
 |
View all Epson Expression 10000XL - Photo manuals
Add to My Manuals
Save this manual to your list of manuals |
Page 60 highlights
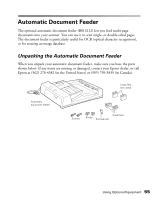
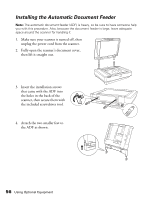
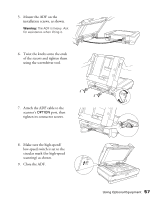
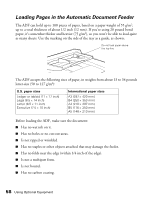
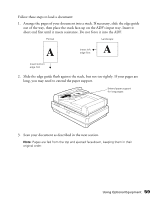
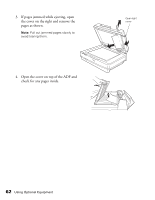
Scanning Your Document You can scan your document in either Office Mode (for text and business documents) or Professional Mode (for photos and other graphics). See page 21 for instructions on scanning a document for OCR. Note: Do not feed valuable photographs or artwork into the ADF; misfeeding could result in wrinkling or damage. Instead, place such items individually on the scanner glass. To scan an individual document while the ADF is attached, just lift the ADF and place your document face-down on the glass. Select Document Table under the Document Source option in EPSON Scan. Do not open the ADF while scanning, or you'll get an error message. See Chapter 1 for basic scanning instructions, and follow these guidelines: ■ For the Document Source setting, select ADF - Single-sided or ADF - Double-sided as appropriate for your document. Make sure you haven't left any documents on the scanner glass. ■ When scanning double-sided documents, you can automatically orient the front and back images of each page the same way (right side up) after scanning. Click the Configuration button, select the ADF Double-sided tab, and choose Match the direction of front and back images. ■ If you want to scan only part of each page, load the first page only. Click the Preview button. The first page is scanned and ejected. Adjust the marquee in the Preview area to select just the area you want to scan (see page 16), then load your entire document (including the first page). When you click Scan, the scanner scans only the selected area for all pages of your document. ■ When you scan multi-page documents and save them as one PDF or Multi-Tiff file, you can change the order, rotate, or delete pages as necessary before saving them. Click Edit page after you finish scanning, then use the icons to edit as necessary. For more information, see your on-screen Reference Guide. ■ You can scan documents whose pages vary in length, but they must all be the same width, and you cannot preview them. After arranging your documents into a stack, hold the stack upright and tap it several times on your desk to even up the bottom edge. Load the stack into the scanner face-up, bottom edge first. In Office Mode, set the Document Size setting to Auto Detect. Scan your document by clicking the Scan button (do not click Preview). 60 Using Optional Equipment
-
 1
1 -
2
-
3
-
4
-
5
-
6
-
7
-
8
-
9
-
10
-
11
-
12
-
13
-
14
-
15
-
16
-
17
-
18
-
19
-
20
-
21
-
22
-
23
-
24
-
25
-
26
-
27
-
28
-
29
-
30
-
31
-
32
-
33
-
34
-
35
-
36
-
37
-
38
-
39
-
40
-
41
-
42
-
43
-
44
-
45
-
46
-
47
-
48
-
49
-
50
-
51
-
52
-
53
-
54
-
 55
55 -
 56
56 -
 57
57 -
 58
58 -
 59
59 -
 60
60 -
 61
61 -
 62
62 -
 63
63 -
 64
64 -
 65
65 -
66
-
67
-
68
-
69
-
70
-
71
-
72
-
73
-
74
-
75
-
76
-
77
-
78
-
79
-
80
-
81
-
82
-
83
-
84
-
85
-
86
-
87
-
88
-
89
-
90
-
91
-
92
-
93
-
94
-
95
-
96
 |
 |
