Epson FastFoto FF-640 Users Guide - Page 66
Scan Settings tab
 |
View all Epson FastFoto FF-640 manuals
Add to My Manuals
Save this manual to your list of manuals |
Page 66 highlights
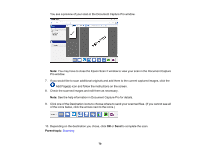
Enhancements tab Auto Enhance Automatically adjusts the brightness, contrast, and saturation of your scanned photos. Remove Red Eye Automatically reduces the red-eye effect in your scanned photos. Restore Faded Colors Restores the colors in faded photos automatically. Apply these enhancements Choose whether to apply the enhancements to the original scanned photos or create a separate enhanced copy with "_a" appended to the filename. Scan Settings tab Scan my photos at this resolution Select the resolution at which to scan your photos. Choose 300 dpi for the fastest or general scanning, choose 600 dpi for higher resolution or archival scanning, or choose 1200 dpi for the highest resolution or enlargements. File Format Choose the file format in which you want to save your scans. Scan the back of my photos with Epson single-step technology Select whether to scan both sides of your photos when Epson FastFoto detects writing or printing on the back of them. Adjust the slider to determine the detection's sensitivity level. Advanced Settings tab Auto rotation Select this checkbox to automatically rotate your scanned images. Curled photo correction Select this checkbox to correct edge brightness on photos that have excessive curling. Reduce lines and streaks Select whether to reduce the appearance of lines and streaks in your photos. Enabling this setting may slightly crop your photos. Upload tab Dropbox Click to enable uploading to Dropbox. 66
-
 1
1 -
2
-
3
-
4
-
5
-
6
-
7
-
8
-
9
-
10
-
11
-
12
-
13
-
14
-
15
-
16
-
17
-
18
-
19
-
20
-
21
-
22
-
23
-
24
-
25
-
26
-
27
-
28
-
29
-
30
-
31
-
32
-
33
-
34
-
35
-
36
-
37
-
38
-
39
-
40
-
41
-
42
-
43
-
44
-
45
-
46
-
47
-
48
-
49
-
50
-
51
-
52
-
53
-
54
-
55
-
56
-
57
-
58
-
59
-
60
-
 61
61 -
 62
62 -
 63
63 -
 64
64 -
 65
65 -
 66
66 -
 67
67 -
 68
68 -
 69
69 -
 70
70 -
 71
71 -
72
-
73
-
74
-
75
-
76
-
77
-
78
-
79
-
80
-
81
-
82
-
83
-
84
-
85
-
86
-
87
-
88
-
89
-
90
-
91
-
92
-
93
-
94
-
95
-
96
-
97
-
98
-
99
-
100
-
101
-
102
-
103
-
104
-
105
-
106
-
107
-
108
-
109
-
110
-
111
-
112
-
113
-
114
-
115
-
116
-
117
-
118
-
119
-
120
-
121
-
122
-
123
-
124
-
125
-
126
-
127
-
128
-
129
-
130
-
131
-
132
-
133
-
134
-
135
-
136
-
137
-
138
-
139
-
140
-
141
-
142
-
143
-
144
-
145
-
146
-
147
-
148
-
149
-
150
-
151
-
152
-
153
-
154
-
155
-
156
-
157
-
158
-
159
-
160
-
161
-
162
-
163
-
164
-
165
-
166
-
167
 |
 |
