Epson LQ-2500 User Manual - Page 11
Epson LQ-2500 - Impact Printer Manual
 |
View all Epson LQ-2500 manuals
Add to My Manuals
Save this manual to your list of manuals |
Page 11 highlights
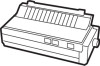
Installing the paper feed knob Install the paper feed knob on the right side of the printer, as shown in Figure 1-2. tine up the flat side of the hole in the knob with the flat side of the shaft, then push the knob firmly into place. Now, that you've installed the paper feed knob, use it to remove the sheet of paper that is behind the printers platen (the black roller). Removing the print head protector Remove the print head protector by opening the paper bail, then lifting the protector up and pulling it to the right as shown in Figure 1-3 below. Figure 1-2. Installing the paper feed knob Figure 1-3. Removing the print head protector 1-2 Setting Up the Printer
-
 1
1 -
2
-
3
-
4
-
5
-
 6
6 -
 7
7 -
 8
8 -
 9
9 -
 10
10 -
 11
11 -
 12
12 -
 13
13 -
 14
14 -
 15
15 -
 16
16 -
17
-
18
-
19
-
20
-
21
-
22
-
23
-
24
-
25
-
26
-
27
-
28
-
29
-
30
-
31
-
32
-
33
-
34
-
35
-
36
-
37
-
38
-
39
-
40
-
41
-
42
-
43
-
44
-
45
-
46
-
47
-
48
-
49
-
50
-
51
-
52
-
53
-
54
-
55
-
56
-
57
-
58
-
59
-
60
-
61
-
62
-
63
-
64
-
65
-
66
-
67
-
68
-
69
-
70
-
71
-
72
-
73
-
74
-
75
-
76
-
77
-
78
-
79
-
80
-
81
-
82
-
83
-
84
-
85
-
86
-
87
-
88
-
89
-
90
-
91
-
92
-
93
-
94
-
95
-
96
-
97
-
98
-
99
-
100
-
101
-
102
-
103
-
104
-
105
-
106
-
107
-
108
-
109
-
110
-
111
-
112
-
113
-
114
-
115
-
116
-
117
-
118
-
119
-
120
-
121
-
122
-
123
-
124
-
125
-
126
-
127
-
128
-
129
-
130
-
131
-
132
-
133
-
134
-
135
-
136
-
137
-
138
-
139
-
140
-
141
-
142
-
143
-
144
-
145
-
146
-
147
-
148
-
149
-
150
-
151
-
152
-
153
-
154
-
155
-
156
-
157
-
158
-
159
-
160
-
161
-
162
-
163
-
164
-
165
-
166
-
167
-
168
-
169
-
170
-
171
-
172
-
173
-
174
-
175
-
176
-
177
-
178
-
179
-
180
-
181
-
182
-
183
-
184
 |
 |

Installing the paper feed knob
Install the paper feed knob on the right side of the printer, as shown
in Figure 1-2. tine up the flat side of the hole in the knob with the flat
side of the shaft, then push the knob firmly into place.
Now, that you’ve installed the paper feed knob, use it to remove the
sheet of paper that is behind the printers platen (the black roller).
Removing the print head protector
Remove the print head protector by opening the paper bail, then
lifting the protector up and pulling it to the right as shown in Figure 1-3
below.
Figure 1-2.
Installing the paper feed knob
Figure 1-3.
Removing the print head protector
1-2
Setting Up the Printer