Epson LQ-2500 User Manual - Page 13
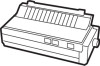
Setting Up the Printer, carriage. As you lower it, make sure the tab on the back of
 |
View all Epson LQ-2500 manuals
Add to My Manuals
Save this manual to your list of manuals |
Page 13 highlights
WARNING The power must be OFF when you move the print head. Otherwise, you may damage the printer mechanism. Also, if you've been using the printer just before changing the ribbon cartridge, be careful not to touch the print head because it becomes hot during use. 3. Move the print head carriage to about 25 on the ruler on the paper bail. 4. Remove the ribbon cartridge from its packaging and tighten the ribbon by turning the knob in the direction of the arrow, as shown in Figure 14. 5. Make sure the paper bail is against the platen. 6. Hold the cartridge, gently squeezing the two ridged plastic tabs together; then lower it (as shown in Figure 1-5) into the print head carriage. As you lower it, make sure the tab on the back of the cartridge rests OR the support ridge on the carriage and that the ribbon passes between the print head and the silver ribbon guide. 7 Release the tabs so that the pins on the tabs click into the holes in the sides of the print head carriage. Figure 1-4. Tightening the ribbon Figure 1-5. Installing the ribbon 1-4 Setting Up the Printer
-
 1
1 -
2
-
3
-
4
-
5
-
6
-
7
-
 8
8 -
 9
9 -
 10
10 -
 11
11 -
 12
12 -
 13
13 -
 14
14 -
 15
15 -
 16
16 -
 17
17 -
 18
18 -
19
-
20
-
21
-
22
-
23
-
24
-
25
-
26
-
27
-
28
-
29
-
30
-
31
-
32
-
33
-
34
-
35
-
36
-
37
-
38
-
39
-
40
-
41
-
42
-
43
-
44
-
45
-
46
-
47
-
48
-
49
-
50
-
51
-
52
-
53
-
54
-
55
-
56
-
57
-
58
-
59
-
60
-
61
-
62
-
63
-
64
-
65
-
66
-
67
-
68
-
69
-
70
-
71
-
72
-
73
-
74
-
75
-
76
-
77
-
78
-
79
-
80
-
81
-
82
-
83
-
84
-
85
-
86
-
87
-
88
-
89
-
90
-
91
-
92
-
93
-
94
-
95
-
96
-
97
-
98
-
99
-
100
-
101
-
102
-
103
-
104
-
105
-
106
-
107
-
108
-
109
-
110
-
111
-
112
-
113
-
114
-
115
-
116
-
117
-
118
-
119
-
120
-
121
-
122
-
123
-
124
-
125
-
126
-
127
-
128
-
129
-
130
-
131
-
132
-
133
-
134
-
135
-
136
-
137
-
138
-
139
-
140
-
141
-
142
-
143
-
144
-
145
-
146
-
147
-
148
-
149
-
150
-
151
-
152
-
153
-
154
-
155
-
156
-
157
-
158
-
159
-
160
-
161
-
162
-
163
-
164
-
165
-
166
-
167
-
168
-
169
-
170
-
171
-
172
-
173
-
174
-
175
-
176
-
177
-
178
-
179
-
180
-
181
-
182
-
183
-
184
 |
 |
