Epson LQ-590 User Manual - Page 14
Reference Guide, try again. - driver windows 7
 |
View all Epson LQ-590 manuals
Add to My Manuals
Save this manual to your list of manuals |
Page 14 highlights
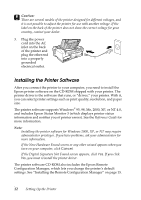
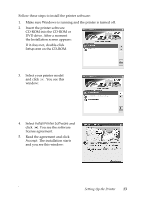
6. Turn on your printer, then wait for the software to be installed. (This may take a few minutes.) If you are prompted to insert the Windows CD-ROM, go to step 7. Otherwise, follow any instructions on the screen until the installation is complete and you see the Installation screen again. Then turn to page 15 and follow the instructions to install the Reference Guide and the Remote Configuration Manager utility. 7. If the installation asks for the Windows CD-ROM, insert the disk in the CD-ROM drive and click OK. When the Windows installation screen appears, close the screen to continue with the driver installation. Note: If you see a message that the drive is not accessible, click Cancel and try again. 8. Click Browse and select the path for the printer driver. Then click OK and follow the on-screen instructions. 9. Select the appropriate file in the folder and click OK. 10. When prompted, insert the printer software CD-ROM and click Browse to select the correct path. Note: ❏ If you see a message that the drive is not accessible, click Cancel and try again. ❏ If a "System Error" message appears, click Cancel. ❏ If you are using Windows NT, you do not need to specify a path. ❏ If you are using Windows 98, the Printer Utility Setup may start. If it does, follow the instructions on the screen. 11. When the installation is complete, see page 15 to install the Reference Guide and the Remote Configuration Manager utility. 14 Setting Up the Printer
-
 1
1 -
2
-
3
-
4
-
5
-
6
-
7
-
8
-
 9
9 -
 10
10 -
 11
11 -
 12
12 -
 13
13 -
 14
14 -
 15
15 -
 16
16 -
 17
17 -
 18
18 -
 19
19 -
20
-
21
-
22
-
23
-
24
-
25
-
26
-
27
-
28
-
29
-
30
-
31
-
32
-
33
-
34
-
35
-
36
-
37
-
38
-
39
-
40
-
41
-
42
-
43
-
44
-
45
-
46
-
47
-
48
 |
 |