Epson P20000 Quick Reference
Epson P20000 Manual
 |
View all Epson P20000 manuals
Add to My Manuals
Save this manual to your list of manuals |
Epson P20000 manual content summary:
- Epson P20000 | Quick Reference - Page 1
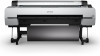
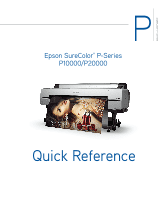
Epson SureColor® P-Series P10000/P20000 Quick Reference - Epson P20000 | Quick Reference - Page 2
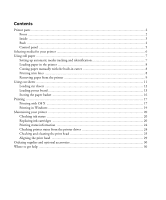
in the printer ...8 Cutting paper manually with the built-in cutter 8 Printing trim lines ...8 Removing paper from the printer 9 Using cut your printer ...20 Checking ink status ...20 Replacing ink cartridges ...20 Printing status information ...24 Checking printer status from the printer driver - Epson P20000 | Quick Reference - Page 3
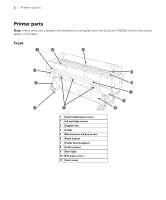
parts Printer parts Note: Unless otherwise indicated, the illustrations in this guide show the SureColor® P20000, but the instructions apply to all models. Front 1 Head maintenance cover 2 Ink cartridge covers 3 Support bar 4 Caster 5 Maintenance ink box covers 6 Paper basket 7 Poster board support - Epson P20000 | Quick Reference - Page 4
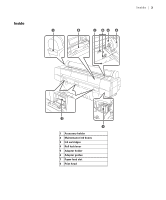
Inside Inside | 3 1 Accessory holder 2 Maintenance ink boxes 3 Ink cartridges 4 Roll lock lever 5 Adapter holder 6 Adapter guides 7 Paper feed slot 8 Print head - Epson P20000 | Quick Reference - Page 5
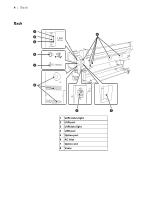
4 | Back Back LAN (100/1000) USB OPTION 1 LAN status light 2 LAN port 3 LAN data light 4 USB port 5 Option port 6 AC inlet 7 Option slot 8 Vents - Epson P20000 | Quick Reference - Page 6
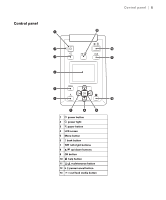
Control panel Control panel | 5 1 P power button 2 P power light 3 M paper button 4 LCD screen 5 Menu button 6 y back button 7 l/r left/right buttons 8 u/d up/down buttons 9 OK button 10 help button 11 maintenance button 12 W pause/cancel button 13 )cut/feed media button - Epson P20000 | Quick Reference - Page 7
sheets to wide-format rolls. Check the Epson Pro Imaging website at www.proimaging.epson.com or your Epson Professional Imaging Authorized Reseller for available media. The following table shows the paper sizes you can use: Supported paper sizes SureColor P10000 Width Length Roll paper 10 to 44 - Epson P20000 | Quick Reference - Page 8
core and a width of up to 44 inches (112 cm) for the SureColor P10000, or 64 inches (163 cm) for the SureColor P20000. Manually switching rolls is a simple process. Note: To prevent dust from accumulating inside the printer, always keep the roll paper cover closed unless you are loading or unloading - Epson P20000 | Quick Reference - Page 9
8 | Loading paper in the printer Loading paper in the printer See the Setup guide for instructions on placing and loading roll paper in the printer. Cutting paper manually with the built-in cutter When Auto Cut is set to Off, you can cut roll paper manually after your print job is finished by - Epson P20000 | Quick Reference - Page 10
guide for manual cutting. 1. Before you print, press the l or r button to select the / tab. 2. Press the Menu button. 3. Press the d button to select Printer trim lines from your printer driver software. For instructions, see the online User's Guide. Removing paper from the printer 1. Press the M - Epson P20000 | Quick Reference - Page 11
10 | Removing paper from the printer 3. Open the roll paper cover. 4. Adjust the paper guides to match the width of the roll paper. 5. Firmly lift the lock lever to release it. 6. Lift the roll out of the printer and place it on top of the paper guides. - Epson P20000 | Quick Reference - Page 12
7. Release the tension levers on both adapters. Removing paper from the printer | 11 8. Remove the adapters from the roll 9. Rewind the paper carefully and place it in its original package. Note: Roll paper should be stored on - Epson P20000 | Quick Reference - Page 13
44 inches (112 cm). You can leave your roll paper in the printer when you print on cut sheets; make sure it is removed from you load cut sheets in the portrait orientation (short edge first). 1. Make sure the printer is turned on and the roll paper cover is closed. 2. Press the M button, press the - Epson P20000 | Quick Reference - Page 14
results, you must select the settings that match the loaded media. 6. Press OK. 7. Print your page. After it is finished, the sheet stays in the printer. 8. To remove your print, press OK while holding the sheet. M Note: To remove paper that was loaded but not used, press the button, press the - Epson P20000 | Quick Reference - Page 15
14 | Loading poster board Loading poster board Make sure you load poster board in the portrait orientation (short edge first). 1. Make sure the printer is turned on and the roll paper cover is closed. 2. Press the M button, press the d or u button to select Poster Board, and press OK. 3. Lift - Epson P20000 | Quick Reference - Page 16
board | 15 5. Align the right edge of the board with the line on the poster board support. Make sure the paper is flush with the front of the printer. 6. Press OK. The poster board feeds into the printer. 7. On the screen that appears, select Keep Settings Above if the settings are correct, or - Epson P20000 | Quick Reference - Page 17
board support back into the printer. Epson media and not using the Epson driver, you may also need to create a paper configuration to optimize your results. A custom paper configuration will override the Platen Gap setting or any adjustments made in the printer driver. See the online User's Guide - Epson P20000 | Quick Reference - Page 18
choose setting. Note: To avoid damaging the printer, make sure you do not decrease the setting the paper basket The paper basket attaches to your printer and catches your printouts as they come out. using the optional auto take-up reel or moving the printer, you can fold the paper basket out of the - Epson P20000 | Quick Reference - Page 19
cloth and insert the loops into the clamps on the bottom of the printer. Printing This section describes basic printing from your Mac or Windows® computer. For detailed instructions, see the online User's Guide. Printing with OS X 1. Open a photo or document in a printing program, then select the - Epson P20000 | Quick Reference - Page 20
often than necessary, set the printer to the type of black ink you usually use. 7. Select a Print Mode that matches the content that you are printing. 8. Select one of the Color Mode options. Note: For color management instructions, see www.epson.com/proimaging/iccprofiles.html. For more information - Epson P20000 | Quick Reference - Page 21
or Properties button. Note: If you see a Setup, Printer, or Options button, click it. Then click Preferences or Photo mode, see your online User's Guide for instructions. 5. For the Print Quality setting, . Note: For color management instructions, see www.epson.com/proimaging/iccprofiles.html. For - Epson P20000 | Quick Reference - Page 22
. For detailed instructions, see the online User's Guide. Note: To keep your printer working properly, make sure to minimize the amount of dust in and around the printer. Checking ink status Before you begin a large print job, you should check your ink levels. If one of your cartridges is low, you - Epson P20000 | Quick Reference - Page 23
package. Caution: Leave the expended cartridge in the printer until you are ready to replace it. To prevent ink reporting errors, never replace the ink cartridges with the printer turned off. You can purchase genuine Epson ink and paper from an Epson Professional Imaging Authorized Reseller. To - Epson P20000 | Quick Reference - Page 24
can use them for transporting the printer, if necessary. WARNING: Do not shake the expended cartridge, or ink may leak. If ink gets on your hands, wash them thoroughly with soap and water. If ink gets in your eyes, flush them immediately with water. Keep ink cartridges out of the reach of children - Epson P20000 | Quick Reference - Page 25
is recommended that you remove the cartridges every 3 months, shake them for 10 seconds, and re-insert them. 6. Close the ink cover. Wait for the printer to check the ink cartridges and charge the ink delivery system, if necessary. Caution: Never turn off the printer while ink is charging or you'll - Epson P20000 | Quick Reference - Page 26
, then press OK. 5. Press OK to start printing. Checking printer status from the printer driver The Epson Status Monitor utility installed with your printer driver lets you check the levels of ink in the printer and the level of the maintenance ink boxes. Follow the steps below to use the utility to - Epson P20000 | Quick Reference - Page 27
head The software checks the amount of ink in the printer and maintenance ink boxes and displays one of these windows: to select the / tab. 2. Press the Menu button. 3. Press the u or d button until Printer Setup is selected, then press OK. 4. Press the u or d button until Auto Nozzle Check is - Epson P20000 | Quick Reference - Page 28
cycle if necessary before each print job. This process uses a very small amount of ink (and no paper) and is recommended if you are running large print jobs unattended (default). • Off: The printer will not perform automatic nozzle checks and cleaning cycles. 7. Press OK. Checking the print - Epson P20000 | Quick Reference - Page 29
printer. 2. Do one of the following to access the printer utilities: • OS X: In the Apple menu or the Dock, select System Preferences. Select Printers your product, and select Options & Supplies. Select Utility and select Open Printer Utility. • Windows: Double-click the icon in the bottom right - Epson P20000 | Quick Reference - Page 30
online User's Guide. The cartridges need to be at least 50% full to use a heavy cleaning. You may need to replace a low cartridge to run the cleaning cycle. After cleaning, you can reinsert the old cartridge. Caution: Don't run a cleaning cycle while thick media is loaded in the printer. 1. Print - Epson P20000 | Quick Reference - Page 31
missing segments or has deflections after a heavy cleaning cycle, turn the printer off and leave it overnight, then clean the print head again the following cycles. If there are still missing segments, see the online User's Guide for details on running a powerful cleaning cycle. Aligning the print - Epson P20000 | Quick Reference - Page 32
accessories Part Ink cartridges Replacement maintenance ink box Automatic Take-Up Reel System Internal print server Additional roll media adapters Replacement printer cutter blade Additional one-year Epson Preferred Plus service plan Additional two-year Epson Preferred Plus service plan Part - Epson P20000 | Quick Reference - Page 33
, UltraChrome, and SureColor are registered trademarks, and EPSON Exceed Your Vision is a registered logomark, of Seiko Epson Corporation. Epson Preferred is a service mark of Epson America, Inc. Mac and OS X are trademarks of Apple Inc., registered in the U.S. and other countries. General Notice - Epson P20000 | Quick Reference - Page 34
CPD-51061 Printed in USA
-
 1
1 -
 2
2 -
 3
3 -
 4
4 -
 5
5 -
 6
6 -
 7
7 -
8
-
9
-
10
-
11
-
12
-
13
-
14
-
15
-
16
-
17
-
18
-
19
-
20
-
21
-
22
-
23
-
24
-
25
-
26
-
27
-
28
-
29
-
30
-
31
-
32
-
33
-
34
 |
 |
Quick Reference
Epson SureColor
®
P-Series
P10000/P20000