Epson P20000 Quick Reference - Page 14
Loading cut sheets, if the settings are correct
 |
View all Epson P20000 manuals
Add to My Manuals
Save this manual to your list of manuals |
Page 14 highlights
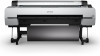
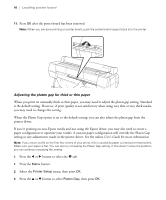
Loading cut sheets | 13 3. Feed the sheet into the paper slot until it meets resistance. Make sure the right edge of the paper is straight and aligned with the vertical line on the roll paper cover. 4. Press OK. The sheet feeds into printing position automatically. 5. On the screen that appears on the LCD screen, select Keep Settings Above if the settings are correct, or select Change Settings and select the correct media. Note: To get the best results, you must select the settings that match the loaded media. 6. Press OK. 7. Print your page. After it is finished, the sheet stays in the printer. 8. To remove your print, press OK while holding the sheet. M Note: To remove paper that was loaded but not used, press the button, press the d or u button to select Remove Paper and press OK.
-
 1
1 -
2
-
3
-
4
-
5
-
6
-
7
-
8
-
 9
9 -
 10
10 -
 11
11 -
 12
12 -
 13
13 -
 14
14 -
 15
15 -
 16
16 -
 17
17 -
 18
18 -
 19
19 -
20
-
21
-
22
-
23
-
24
-
25
-
26
-
27
-
28
-
29
-
30
-
31
-
32
-
33
-
34
 |
 |
