Epson Photo Plus User Manual - Page 48
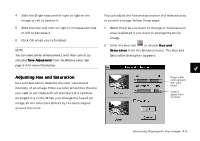
Sharpening, Pan Mode box.
 |
View all Epson Photo Plus manuals
Add to My Manuals
Save this manual to your list of manuals |
Page 48 highlights
3 If you want to see a small area of your image enlarged in the Before and After windows, click the Pan Mode box. Sharpening You can use the Sharpen tool to give your image a more focused look, with harder edges. Follow these steps: 4 Click Auto to have PhotoPlus make the tone adjustment automatically. You see the mapping curve change to reflect the modified image. 5 Slide the Highlight control to the right to expand the highlight area. This also increases contrast in the midtones. Slide the control to the left to reduce the 1 Select the area you want to change, or make sure no area is selected to change the entire image. 2 Click the Sharpen button or choose Sharpen from the Enhance menu. The Sharpen dialog box appears: highlight area and darken the image. 4 6 Slide the Midtone control to the right to lighten the midtones or to the left to darken these areas. Adjusting the midtones (also known as gamma value) does not affect the highlights or shadows. 7 Slide the Shadow control to the right to reduce the shadow area and lighten the image. Slide it to the left to expand the shadow area and darken the A image. This also increases contrast in the midtones. 8 Click OK when you're finished. B Enhancing: Playing with Your Images 4-5
-
 1
1 -
2
-
3
-
4
-
5
-
6
-
7
-
8
-
9
-
10
-
11
-
12
-
13
-
14
-
15
-
16
-
17
-
18
-
19
-
20
-
21
-
22
-
23
-
24
-
25
-
26
-
27
-
28
-
29
-
30
-
31
-
32
-
33
-
34
-
35
-
36
-
37
-
38
-
39
-
40
-
41
-
42
-
 43
43 -
 44
44 -
 45
45 -
 46
46 -
 47
47 -
 48
48 -
 49
49 -
 50
50 -
 51
51 -
 52
52 -
 53
53 -
54
-
55
-
56
-
57
-
58
-
59
-
60
-
61
-
62
-
63
-
64
-
65
-
66
-
67
-
68
-
69
-
70
-
71
-
72
-
73
-
74
-
75
-
76
-
77
-
78
-
79
-
80
-
81
-
82
-
83
-
84
-
85
-
86
-
87
-
88
-
89
-
90
-
91
-
92
-
93
-
94
-
95
-
96
-
97
-
98
-
99
-
100
-
101
-
102
-
103
-
104
-
105
-
106
-
107
-
108
-
109
-
110
-
111
-
112
-
113
-
114
-
115
-
116
-
117
 |
 |