Epson PictureMate Product Information Guide - Page 3
Inserting a Memory Card, Using PictureMate, Without a Computer, Using PictureMate With a Computer - user s guide
 |
UPC - 010343849952
View all Epson PictureMate manuals
Add to My Manuals
Save this manual to your list of manuals |
Page 3 highlights
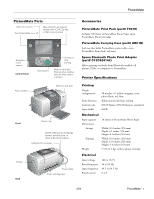
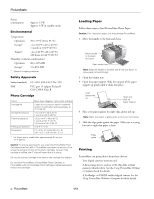
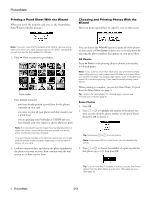
PictureMate ❏ A Bluetooth®-enabled device (requires an optional Bluetooth Photo Print adapter). See the Using PictureMate Without a Computer book for details. ❏ Your computer. See the Using PictureMate With a Computer booklet and the on-screen User's Guide (included on your PictureMate CD) for details. However your photos are stored, make sure the image files meet these requirements: ❏ JPEG files or uncompressed Tiff files only ❏ The file storage device should comply with DCF (Design rule for Camera File systems) Version 1.0 ❏ Resolutions ranging from 160 × 160 to 4600 × 4600 pixels Your PictureMate recognizes and prints the first 999 photos on your memory card or device. Inserting a Memory Card Note: Insert just one card at a time. The card does not go in all the way. See above for supported photo file formats. 1. Press On to turn on PictureMate. 2. Open the memory card door. 3. Insert the memory card into one of the three slots. CompactFlash® or MicrodriveTM (bottom) SD (Secure Digital) or MMC (MultiMediaCard) (middle) Memory Stick® (middle) xD Picture CardTM (top) SmartMediaTM (top) 4. Push the card in carefully until it stops (it won't go in all the way). When it is in, the card light comes on. Card light 5. Close the memory card door. Now you can print a proof sheet of all the photos on your card using the PictureMate Print Wizard (see page 4). You can also choose photos and layouts for printing from the Main Menu (see page 5). Removing a Memory Card Make sure the card light is not flashing, then pull the card straight out of the slot. Caution: Do not remove a card while the card light is flashing; you may lose photos on your card. 4/04 PictureMate - 3
-
 1
1 -
 2
2 -
 3
3 -
 4
4 -
 5
5 -
 6
6 -
 7
7 -
 8
8 -
 9
9 -
10
 |
 |
