Epson PictureMate Product Information Guide - Page 6
Set the Number of Copies, Choose a Layout, Confirm and Print, On the Main Menu, press
 |
UPC - 010343849952
View all Epson PictureMate manuals
Add to My Manuals
Save this manual to your list of manuals |
Page 6 highlights
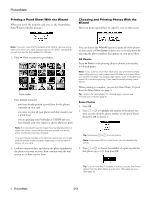
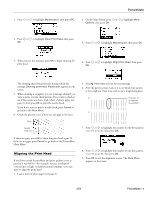
PictureMate 3. Press or to choose the last photo under To. Then press OK. 2. Press or to highlight the number of copies you want to print for each photo (1 to 100), then press OK. Go to "Set the Number of Copies" below to choose a number of copies. Camera-selected DPOF Photos If you have chosen photos in your camera, DPOF is selected as the Select Photo option by default. The photos that you chose from your camera to print are automatically selected, including the number of copies. 3. Continue with the next section to choose a layout for your photos. Choose a Layout 1. On the Main Menu, press or to choose Layout, then press OK. Just press Print to print your DPOF photos. Deselect DPOF If DPOF is selected and you want to choose other photos to print instead, press or to highlight Select Photo, press OK, then choose a different option. Set the Number of Copies You can print from 1 to 100 copies of your selected photos. Keep in mind that if you are printing all photos or a range of photos, the number of copies applies to every photo. Note: If you are printing Several photos, you already chose the number of copies for each photo, so the Copies setting can't be changed from the Main Menu. (You can choose up to 10 copies per photo when printing Several.) If you are printing DPOF photos, the number of copies is selected from your camera and the Copies setting can't be changed from the Main Menu. 1. After selecting photos on the Main Menu, press or to highlight Copies, then press OK. 2. Press or to highlight the layout setting you want for your photo(s), then press OK. You have four choices: Borderless Border Proof Sheet (20 per sheet) Wallet (2 per sheet) 3. Continue with the next section to confirm your selections and print. Confirm and Print Once you have made all the basic print settings, you are ready to print. 1. Press Print. 2. Check the selected photos, number of copies, and layout setting on the Print Confirmation screen. (Press or to see additional selected photos.) 6 - PictureMate ❏ If the list is okay, press Print again to print your photo(s). ❏ To make changes, press Cancel to go back. 4/04
-
 1
1 -
 2
2 -
 3
3 -
 4
4 -
 5
5 -
 6
6 -
 7
7 -
 8
8 -
 9
9 -
 10
10
 |
 |
