Epson PowerLite 735c Product Information Guide - Page 3
Starting Up the Projector, Caution, Warning - wireless projector
 |
View all Epson PowerLite 735c manuals
Add to My Manuals
Save this manual to your list of manuals |
Page 3 highlights
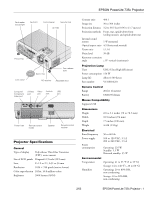
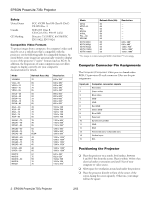
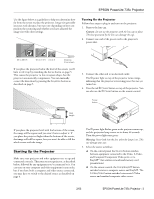
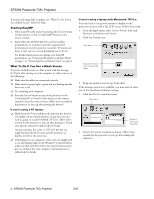
EPSON PowerLite 735c Projector Use the figure below as a guideline to help you determine how far from the screen to place the projector. Image size generally increases with distance, but may vary depending on how you position the zoom ring and whether you have adjusted the image size with other settings. Turning On the Projector Follow these steps to plug in and turn on the projector: 1. Remove the lens cap. Caution: Do not use the projector with the lens cap in place. The heat generated by the lens can damage the cap. 2. Connect one end of the power cord to the projector's power inlet. 33 to 38.5 ft 6.5 to 7.5 ft 3 to 4 ft Distance from screen If you place the projector below the level of the screen, you'll have to tilt it up by extending the feet as shown on page 5. This causes the projector to lose its square shape, but the projector automatically compensates. You can manually correct the distortion by pressing the Keystone button as described on page 5. 3. Connect the other end to an electrical outlet. The P power light on top of the projector turns orange, indicating that the projector is receiving power but not yet turned on. 4. Press the red P Power button on top of the projector. You can also use the P Power button on the remote control. Power button Ideal height If you place the projector level with the bottom of the screen, the image will be square and you won't have to adjust it. If you place the projector higher than the bottom of the screen, the image will still be square, but you won't be able to fill the whole screen with the image. Starting Up the Projector Make sure your projector and other equipment are set up and connected correctly. Then turn on your projector, as described below, followed by any equipment you've connected to it. You can turn on your computer and video equipment in any order, but if you have both a computer and video source connected, you may have to switch to the desired source as described on page 4. The P power light flashes green as the projector warms up, and the projection lamp comes on in about 40 seconds. Then the power light stays green. Warning: Never look into the lens when the lamp is on. This can damage your eyes. 5. Select the source as follows: ❏ On the control panel, the Source button switches between equipment connected to the Video, S-Video, and Computer/Component Video ports, or to EasyMP™ (for wireless network and memory card presentations). ❏ On the remote control, the Comp/EasyMP button switches between a computer source and EasyMP. The S-Video/Video button switches between an S-Video source and standard composite video source. 2/03 EPSON PowerLite 735c Projector - 3
-
 1
1 -
 2
2 -
 3
3 -
 4
4 -
 5
5 -
 6
6 -
 7
7 -
 8
8 -
 9
9 -
10
-
11
-
12
-
13
 |
 |
