Epson PowerLite 735c Product Information Guide - Page 7
Using the Control Panel, Projecting Wirelessly in Ad Hoc Mode, EPSON PowerLite 735c Projector - remote
 |
View all Epson PowerLite 735c manuals
Add to My Manuals
Save this manual to your list of manuals |
Page 7 highlights
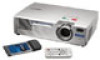
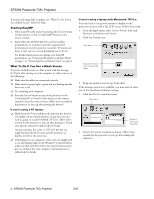
EPSON PowerLite 735c Projector Button A/V Mute Zoom-in Zoom-out Arrow buttons Enter Auto Esc Function Turns off audio and video, displaying the black, blue, or user logo background. Press again to turn audio and video back on. Enlarges the image size. Reduces the image size. Use to navigate menus or to use the remote as a mouse pointer when the projector is connected to a computer with the mouse cable. Selects a highlighted menu option, or advances to the next image in a slideshow. Optimizes the computer image. Stops the current function. Pressing Esc while viewing a menu displays the previous menu. Pressing while viewing a slideshow exits the slideshow. Note: The projector might not respond to remote control commands in these conditions: the battery is weak; ambient light is too bright; a certain type of fluorescent light is present; a strong light source (such as direct sunlight) shines into the infrared receiver; or other equipment emitting infrared energy is present (such as a radiant room heater). Correct these conditions to use the remote control. Using the Control Panel The following table summarizes the functions of the buttons on top of the projector. Button Power Help Source Enter Keystone Select Function Turns the projector on or off. Displays the online help menu. Switches between Computer, Video, S-Video, and EasyMP (for wireless network and memory card presentations). Selects a menu option when the Help menu is displayed. Adjusts a trapezoid-shaped distorted image; corrects up to a ±15° tilt. Scrolls through options when the Help menu is displayed. Projecting Wirelessly in Ad Hoc Mode Follow these steps to project wirelessly if you've already configured your computer and projector to work in ad hoc mode. 1. Turn on the projector as described on page 3. 2. Select EasyMP as the source, using either the Comp/ EasyMP button on the remote control or the Source button on the projector (see page 7). 3. If you haven't already done so, insert the EPSON 802.11b card with the blue label facing up. Insert card into card slot Note: Only the EPSON 802.11b card is guaranteed to work. Other brands are not compatible. You see a message that the network screen is ready to connect. At the bottom of the screen, you see the projector name and ESSID identifier. 4. From the Start menu, select EMP NS Connection. You see this screen: Select your projector If the connection is working properly, you see your projector listed as shown. If you have additional projectors on the network, they are also listed. 2/03 EPSON PowerLite 735c Projector - 7
-
 1
1 -
 2
2 -
 3
3 -
 4
4 -
 5
5 -
 6
6 -
 7
7 -
 8
8 -
 9
9 -
 10
10 -
 11
11 -
 12
12 -
13
 |
 |
