Epson PowerLite 8150NL User Manual - Page 14
Presenting Without a Computer, select the projector
 |
View all Epson PowerLite 8150NL manuals
Add to My Manuals
Save this manual to your list of manuals |
Page 14 highlights
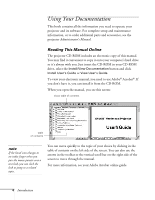
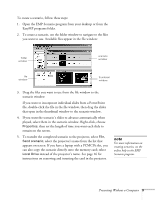
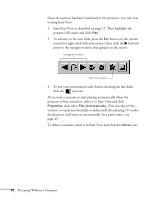
To create a scenario, follow these steps: 1. Open the EMP Scenario program from your desktop or from the EasyMP programs folder. 2. To create a scenario, use the folder window to navigate to the files you want to use. Available files appear in the file window: folder window scenario window file window thumbnail window 3. Drag the files you want to use from the file window to the scenario window. If you want to incorporate individual slides from a PowerPoint file, double-click the file in the file window, then drag the slides that open in the thumbnail window to the scenario window. 4. If you want the scenario's slides to advance automatically when played, select them in the scenario window. Right-click, choose Properties, then set the length of time you want each slide to remain on the screen. 5. To transfer the completed scenario to the projector, select File, Send scenario; select the projector's name from the list that appears on screen. If you have a laptop with a PCMCIA slot, you can also copy the scenario directly onto the memory card; select Local Drive instead of the projector's name. See page 16 for instructions on removing and inserting the card in the projector. note For more information on creating scenarios, see the online help in the EMP Scenario program. Presenting Without a Computer 9
-
 1
1 -
2
-
3
-
4
-
5
-
6
-
7
-
8
-
 9
9 -
 10
10 -
 11
11 -
 12
12 -
 13
13 -
 14
14 -
 15
15 -
 16
16 -
 17
17 -
 18
18 -
 19
19 -
20
-
21
-
22
-
23
-
24
-
25
-
26
-
27
-
28
-
29
-
30
-
31
-
32
-
33
-
34
-
35
-
36
-
37
-
38
-
39
-
40
-
41
-
42
-
43
-
44
-
45
-
46
-
47
-
48
-
49
-
50
-
51
-
52
-
53
-
54
-
55
-
56
-
57
-
58
-
59
-
60
-
61
-
62
-
63
-
64
-
65
-
66
-
67
-
68
-
69
-
70
-
71
-
72
-
73
-
74
-
75
-
76
-
77
-
78
-
79
-
80
-
81
-
82
-
83
 |
 |
