Epson PowerLite 8150i Product Information Guide - Page 4
Positioning the Projector, Adjusting the Height of the Image, Correcting Keystone Distortion
 |
View all Epson PowerLite 8150i manuals
Add to My Manuals
Save this manual to your list of manuals |
Page 4 highlights
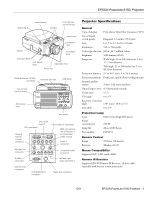
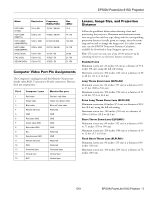
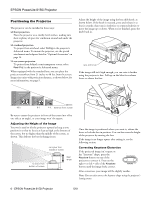
EPSON PowerLite 8150i Projector Positioning the Projector The projector can be installed in three ways: ❏ front projection Place the projector on a sturdy, level surface, making sure there is plenty of space for ventilation around and under the projector. ❏ overhead projection To project from overhead, select Ceiling in the projector's Advanced menu. To mount the projector, use the special attachments and adapters listed in "Optional Accessories" on page 14. ❏ rear-screen projection To project from behind a semi-transparent screen, select Rear Proj. in the projector's Advanced menu. When equipped with the standard lens, you can place the projector anywhere from 21 inches to 48 feet from the screen. Image size varies with projection distance, as shown below; for more information, see page 5. Adjust the height of the image using the lens shift knob, as shown below. If the knob is recessed, press and release it so that it extends; then turn it clockwise or counterclockwise to move the image up or down. When you're finished, press the knob back in. lens shift knob If the image still isn't high enough, you can raise it further using the projector's feet. Pull up on the blue foot release levers to release the feet. 43 ft 8 ft 4 ft distance from screen Be sure to center the projector in front of the screen (not off to one side at an angle), or your image won't be square. Adjusting the Height of the Image You won't need to tilt the projector upward as long as you position it so that its lens is at least as high as the bottom of the screen, but no higher than the middle of the screen, as shown. This delivers the best-looking picture. no higher than middle of screen no lower than bottom of screen ideal range Once the image is positioned where you want it, release the levers to lock the feet in position. You can fine-tune the height of the projector by turning the feet. If the image is no longer square after raising it, see the following section. Correcting Keystone Distortion If the projected image isn't square or has "keystone" shape, press the Keystone button on top of the projector to correct it. Press on the right + or left - side of the Keystone button until the image looks correct. Sync. Keystone Volume After correction, your image will be slightly smaller. Note: You can also correct the keystone shape using the projector's Setting menu. 6 - EPSON PowerLite 8150i Projector 5/01
-
 1
1 -
 2
2 -
 3
3 -
 4
4 -
 5
5 -
 6
6 -
 7
7 -
 8
8 -
 9
9 -
 10
10 -
11
-
12
 |
 |
