Epson PowerLite 8150i Product Information Guide - Page 9
EPSON PowerLite 8150i Projector - 11, This table summarizes the functions on the remote control.
 |
View all Epson PowerLite 8150i manuals
Add to My Manuals
Save this manual to your list of manuals |
Page 9 highlights
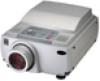
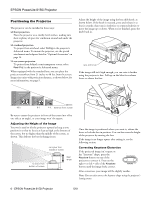
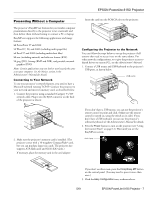
EPSON PowerLite 8150i Projector This table summarizes the functions on the remote control. Button Function Power Starts or stops projection. on/off switch Turns the remote control on or off. Prevents the batteries from discharging if something presses against one of the buttons in the carrying case. Freeze Keeps the current computer or video image on the screen. A/V mute Turns off the audio and video, displaying either a blank screen or the user's logo. E-Zoom Enlarges the image up to four times (in 32 steps). Pressing the right side of the button enlarges the image, pressing the left side of the button reduces the image. To display a portion of an enlarged image that is outside the display area, press the Enter button and scroll the image to the desired location. Effects buttons Display preprogrammed special effects on the screen (see table at right). Additional effects can be selected through the Effect menu or by using the EMP Link V software. Enter (pointer button) Use the Enter button like a mouse to navigate through EasyMP.net, or to make selections in the projector's help and menu systems. Also lets you position special effects on the screen and can be used in place of your computer's mouse when the computer is connected with the projector's mouse cable. Pressing the Enter button acts as a left mouse click. Light Illuminates all buttons on the remote control temporarily. Esc Stops the current function. Pressing Esc while viewing a menu or the online help displays the previous screen or menu. Also functions as a right mouse click. Menu Displays or hides the menu. Help Displays the online help menu. Comp1 Switches to the Computer 1 image. Comp2/YCbCr Switches to the Computer 2 or component video source. EasyMP.net Switches the source to the EasyMP.net screen. Video Switches to the composite video or S-video source. Capture/Auto When EasyMP is running, can be used to capture an image. Otherwise, optimizes the image from a connected computer. APPs/Resize When EasyMP is running, calls up a menu of applications. Otherwise, can be used to manually resize the computer image. Button P in P Preset - Volume + Function Displays a composite video or S-video image in a subscreen on the main display. Use the Enter button to reposition the Picture in Picture (P in P) screen, or the E-Zoom button to enlarge or reduce the image. Changes made to the P in P screen location and size are automatically carried over to the next P in P session. Saves and recalls up to five different session settings (resolution, tracking, sync signal, and position). To save the current session settings, press the Preset button to assign it to the next available number, 1 through 5. To recall a setting, press the Preset button a second time and move to the desired session number. To overwrite a saved setting, move to the setting you want to replace and press Enter. When the confirmation message displays, choose Yes and press Enter. Adjusts the volume. The five special effects buttons are preprogrammed with the following functions: Button 1 2 3 4 5 Function Changes the mouse cursor to an arrow or stamp Lets you draw one or more boxes on the screen Spotlights a section of the screen Lets you place a vertical or horizontal bar on the screen to highlight a part of your image Erases the drawing effects on the screen Note: You can use the projector's Effect menu to select different options for each of the drawing tools. 5/01 EPSON PowerLite 8150i Projector - 11
-
 1
1 -
2
-
3
-
 4
4 -
 5
5 -
 6
6 -
 7
7 -
 8
8 -
 9
9 -
 10
10 -
 11
11 -
 12
12
 |
 |