Epson PowerLite 81p Product Information Guide - Page 3
Positioning the Projector, Starting Up the Projector - lamp
 |
View all Epson PowerLite 81p manuals
Add to My Manuals
Save this manual to your list of manuals |
Page 3 highlights
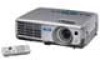
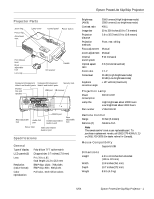
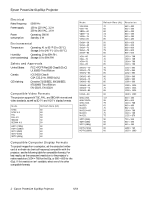
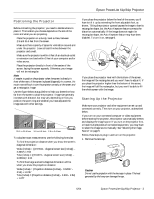
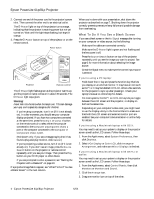
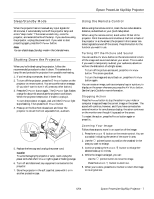
Epson PowerLite 61p/81p Projector Positioning the Projector Before connecting the projector, you need to decide where to place it. The location you choose depends on the size of the room and what you are projecting. ❏ Place the projector on a sturdy, level surface, between 2.9 and 35.5 feet from the screen. ❏ Make sure there is plenty of space for ventilation around and under the projector. Leave at least 8 inches between the projector and a wall. ❏ Make sure the projector is within 6 feet of an electrical outlet or extension cord and within 5 feet of your computer and/or video source. ❏ Place the projector directly in front of the center of the screen, facing the screen squarely. Otherwise, your image will not be rectangular. Note: It's easier to position the projector when the screen is directly in front of the room. If the screen is placed diagonally in a corner, it's much more difficult to aim the projector correctly at the screen and get a rectangular image. Use the figure below as a guideline to help you determine how far from the screen to place the projector. Image size generally increases with distance, but may vary depending on how you position the zoom ring and whether you have adjusted the image size with other settings. 30.1 to 35.5 feet 5.9 to 6.8 feet 2.9 to 3.4 feet To calculate exact measurements, use the following formulas: ❏ To find the projection distance when you know the screen's diagonal dimension: Wide (inches) = ((2.97334 × diagonal screen size [inches]) - 2.3937) / 2.54 Tele (inches) = ((3.61474 × diagonal screen size [inches]) - 2.06831) / 2.54 ❏ To find how large a screen's diagonal dimension will be when you know the projection distance: Wide (inches) = (Projection distance [inches] × 0.32827 × 2.54) + 1.6767 Tele (inches) = (Projection distance [inches] × 0.203 × 2.54) + 1.077 If you place the projector below the level of the screen, you'll have to tilt it up by extending the front adjustable foot, as shown. Tilting the projector upward causes the image to lose its rectangular shape, but the Auto Keystone feature corrects the distortion automatically. If the image does not regain its rectangular shape, the Auto Keystone feature may have been disabled. To turn it on, see page 6. If you place the projector level with the bottom of the screen, the image will be rectangular and you won't have to adjust it. If you place the projector higher than the bottom of the screen, the image will still be rectangular, but you won't be able to fill the whole screen with the image. Starting Up the Projector Make sure your projector and other equipment are set up and connected correctly. Then turn on your projector, as described below. If you turn on your connected computer or video equipment before starting the projector, the projector automatically detects and displays the image source. If you turn on the projector first, or have multiple pieces of connected equipment, you may have to select the image source manually. See "Selecting the Image Source" on page 5. Follow these steps to plug in and turn on the projector: 1. Remove the lens cap. Caution Do not use the projector with the lens cap in place. The heat generated by the lamp can damage the cap. 6/04 Epson PowerLite 61p/81p Projector - 3
-
 1
1 -
 2
2 -
 3
3 -
 4
4 -
 5
5 -
 6
6 -
 7
7 -
 8
8 -
 9
9 -
10
-
11
-
12
-
13
-
14
 |
 |