Epson PowerLite 81p Product Information Guide - Page 6
Adjusting the Image Shape, Adjusting the Brightness, Adjusting the Color Mode, Correcting Computer
 |
View all Epson PowerLite 81p manuals
Add to My Manuals
Save this manual to your list of manuals |
Page 6 highlights
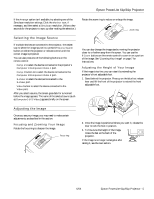
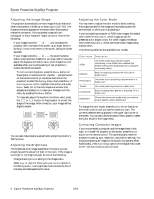
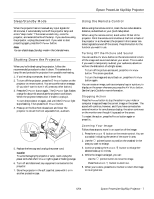
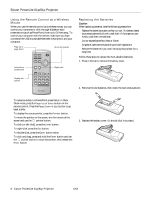
Epson PowerLite 61p/81p Projector Adjusting the Image Shape The projector automatically corrects images that are distorted when the projector is tilted up or down (up to a 15° tilt). The Keystone window appears on the screen while the projector makes the correction. If the projected image still isn't rectangular or has a "keystone" shape, do one or more of the following: ❏ If your image looks like or , you've placed the projector off to one side of the screen, at an angle. Move it directly in front of the center of the screen, facing the screen squarely. ❏ If your image looks like or , the Auto Keystone feature may have been disabled or you may need to manually adjust the keystone correction value. (Auto Keystone is not available when you're using ceiling or rear projection.) Follow the directions below: ❏ To turn on Auto Keystone, press the Menu button on the projetor or remote control. Use the pointer button on the remote control (or the arrow buttons on the projector) to select the Setting menu, then press Enter. If Auto Keystone is OFF, highlight this option and press Enter. Select ON in the Auto Keystone window that appears and press Enter to save your changes. Exit the menu by pressing the Menu button. ❏ To manually adjust the keystone correction value, press the or button on the projector to correct the shape of the image. After correction, your image will be slightly smaller. You can also make keystone adjustments using the projector's Setting menu. Adjusting the Brightness The brightness of an image depends on the source you are projecting and the amount of light in the room. If the image is too bright or not bright enough, do one of the following: ❏ Change the Brightness setting in the Image menu. ❏ Select Low or High for the Brightness Control option in the Setting menu. Low brightness mode extends the life of the lamp and decreases the fan noise. Adjusting the Color Mode You may want to adjust the color mode to select a setting that is appropriate for the image you're projecting and the environment in which you're projecting it. If you're projecting computer or RGB video images, the default color mode is Presentation, which is appropriate for presentations in bright rooms. For other images, the default color mode is Dynamic, which optimizes video images using natural colors. The following table lists the available color modes. Color mode Description sRGB Use when projecting computer images conforming to the sRGB color standard (the default setting when projecting from a computer with analog video). Dynamic Best for projecting movies with vivid color in bright rooms. Presentation Use when you're projecting a presentation in a bright room. Theater Use when projecting movies in a dark room. Living Room Best for playing video games or watching TV in a bright room. Blackboard Choose this fixed color mode when you need to project against a green blackboard. To change the color mode, press the Color Mode button on the remote control until you see the mode you want. The currently selected setting appears in the upper right corner of the screen. You can also use the projector menu system to select the Color Mode in the Image menu. Correcting Computer Images If you've connected a computer and the image doesn't look right, or it doesn't fit properly on the screen, press the Auto button on the remote control. This automatically resets the projector's tracking, sync, resolution, and position settings. You must be projecting an image for this button to have any effect. Additionally, if the Auto Setup option in the Signal menu is set to OFF, the Auto function will not work. 6 - Epson PowerLite 61p/81p Projector 6/04
-
 1
1 -
 2
2 -
 3
3 -
 4
4 -
 5
5 -
 6
6 -
 7
7 -
 8
8 -
 9
9 -
 10
10 -
 11
11 -
 12
12 -
13
-
14
 |
 |