Epson PowerLite Home Cinema 1040 User Manual - Page 78
Resizing the Image, Enter, Parent topic, Related references, PowerLite Home Cinema 640
 |
View all Epson PowerLite Home Cinema 1040 manuals
Add to My Manuals
Save this manual to your list of manuals |
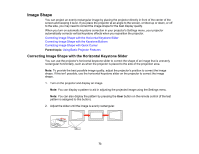
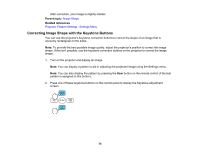
Page 78 highlights
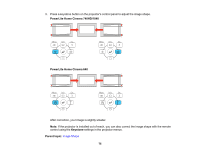
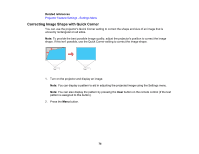
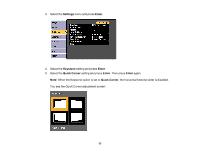
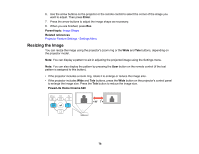
6. Use the arrow buttons on the projector or the remote control to select the corner of the image you want to adjust. Then press Enter. 7. Press the arrow buttons to adjust the image shape as necessary. 8. When you are finished, press Esc. Parent topic: Image Shape Related references Projector Feature Settings - Settings Menu Resizing the Image You can resize the image using the projector's zoom ring or the Wide and Tele buttons, depending on the projector model. Note: You can display a pattern to aid in adjusting the projected image using the Settings menu. Note: You can also display the pattern by pressing the User button on the remote control (if the test pattern is assigned to this button). • If the projector includes a zoom ring, rotate it to enlarge or reduce the image size. • If the projector includes Wide and Tele buttons, press the Wide button on the projector's control panel to enlarge the image size. Press the Tele button to reduce the image size. PowerLite Home Cinema 640 78
-
 1
1 -
2
-
3
-
4
-
5
-
6
-
7
-
8
-
9
-
10
-
11
-
12
-
13
-
14
-
15
-
16
-
17
-
18
-
19
-
20
-
21
-
22
-
23
-
24
-
25
-
26
-
27
-
28
-
29
-
30
-
31
-
32
-
33
-
34
-
35
-
36
-
37
-
38
-
39
-
40
-
41
-
42
-
43
-
44
-
45
-
46
-
47
-
48
-
49
-
50
-
51
-
52
-
53
-
54
-
55
-
56
-
57
-
58
-
59
-
60
-
61
-
62
-
63
-
64
-
65
-
66
-
67
-
68
-
69
-
70
-
71
-
72
-
 73
73 -
 74
74 -
 75
75 -
 76
76 -
 77
77 -
 78
78 -
 79
79 -
 80
80 -
 81
81 -
 82
82 -
 83
83 -
84
-
85
-
86
-
87
-
88
-
89
-
90
-
91
-
92
-
93
-
94
-
95
-
96
-
97
-
98
-
99
-
100
-
101
-
102
-
103
-
104
-
105
-
106
-
107
-
108
-
109
-
110
-
111
-
112
-
113
-
114
-
115
-
116
-
117
-
118
-
119
-
120
-
121
-
122
-
123
-
124
-
125
-
126
-
127
-
128
-
129
-
130
-
131
-
132
-
133
-
134
-
135
-
136
-
137
-
138
-
139
-
140
-
141
-
142
-
143
-
144
-
145
-
146
-
147
-
148
-
149
-
150
-
151
-
152
-
153
-
154
-
155
-
156
-
157
-
158
-
159
-
160
-
161
-
162
-
163
-
164
-
165
-
166
-
167
-
168
-
169
-
170
-
171
-
172
-
173
-
174
-
175
-
176
-
177
-
178
-
179
-
180
-
181
-
182
-
183
-
184
-
185
-
186
-
187
-
188
-
189
-
190
-
191
-
192
-
193
-
194
-
195
-
196
-
197
-
198
-
199
-
200
-
201
-
202
-
203
-
204
-
205
-
206
-
207
-
208
-
209
-
210
-
211
-
212
-
213
-
214
-
215
-
216
-
217
-
218
-
219
-
220
-
221
-
222
-
223
-
224
-
225
-
226
-
227
-
228
-
229
-
230
-
231
-
232
-
233
-
234
-
235
-
236
-
237
-
238
-
239
-
240
-
241
-
242
 |
 |
