Epson R1900 Product Information Guide - Page 7
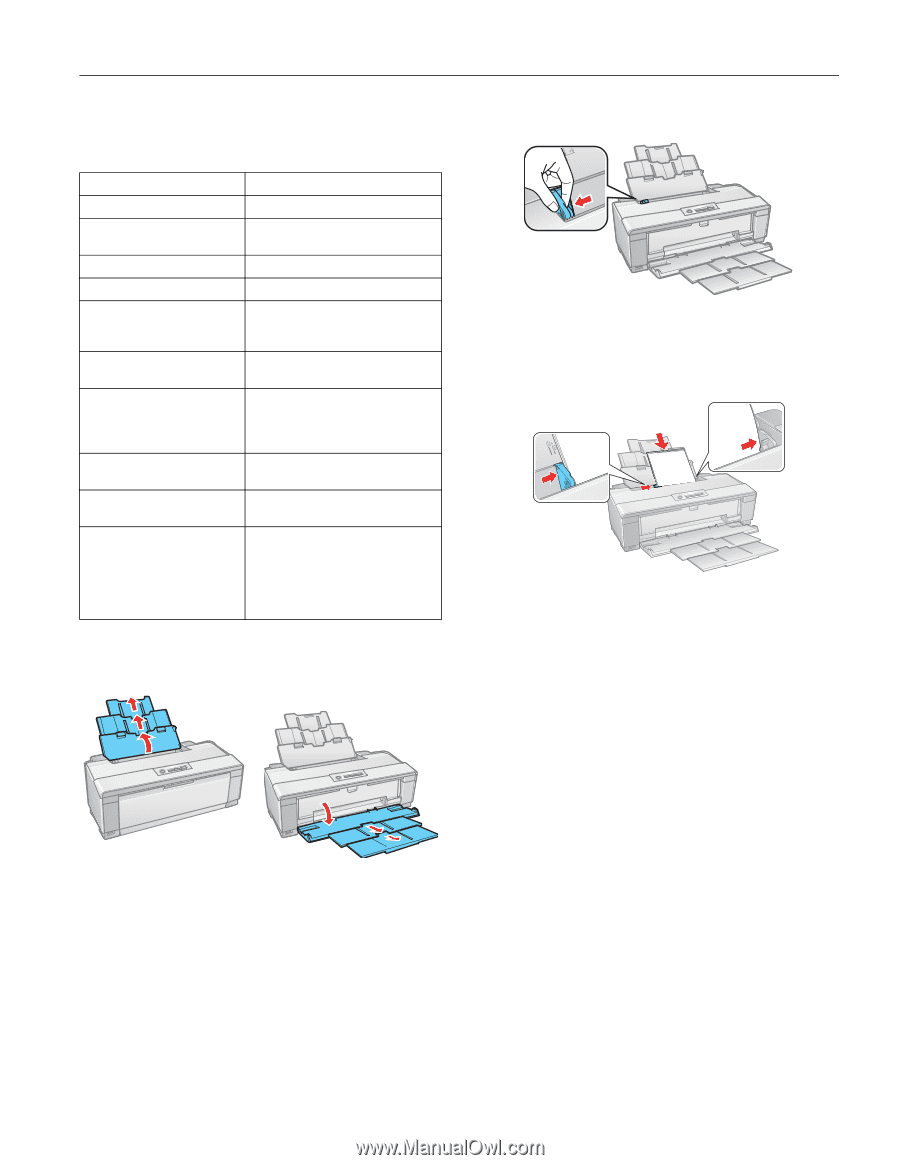
Loading Paper in the Sheet Feeder, against the right side and beneath the tab.
 |
UPC - 010343866058
View all Epson R1900 manuals
Add to My Manuals
Save this manual to your list of manuals |
Page 7 highlights
Epson Stylus Photo R1900 Series Loading Paper in the Sheet Feeder You can load these types and sizes of paper in the sheet feeder: Paper type Plain paper Epson Presentation Paper Matte Epson Bright White Paper Epson Photo Paper Glossy Epson Premium Photo Paper Glossy Epson Ultra Premium Photo Paper Glossy Epson Ultra Premium Photo Paper Luster Epson Ultra Premium Presentation Paper Matte Epson Premium Photo Paper Semi-gloss Epson Premium Presentation Paper Matte Epson Premium Presentation Paper Matte Double-sided Epson Photo Quality Self-adhesive Sheets Epson Iron-on Cool Peel Transfer Paper Load up to this many sheets Approximately 120 100 50 (B or Super B) 80 30 (all sizes) 30 (4 × 6 inch, 8 × 10 inch, Letter) 20 (5 × 7 inch) 10 (11 × 14 inch, B, A3, Super B) 30 (4 × 6 inch, 8 × 10 inch, Letter) 20 (5 × 7 inch) 30 (Letter) 10 (A3 or Super B) 30 (4 × 6 inch or Letter) 10 (B) 30 (8 × 10 inch or Letter) 10 (11 × 14 inch, A3, or Super B) 1 sheet 1. Open the paper support and pull up the extensions. 2. Open the output tray and pull out the extensions. 3. Slide the edge guide left. 4. Insert paper, glossy or printable side up, short edge first, against the right side and beneath the tab. 5. Press the button on the edge guide and slide it to the edge of the paper, but not too tightly. Note: Load only up to the recommended number of sheets. Load paper short edge first, no matter which way your photo or document faces. Load letterhead or pre-printed paper top edge first and printed side up. Do not load paper above the arrow on the edge guide. Check the paper package for any additional loading instructions. The left edge guide may move slightly during paper feeding and printing. Do not adjust the edge guide or open the printer cover during printing. 11/07 Epson Stylus Photo R1900 Series - 7
-
 1
1 -
 2
2 -
 3
3 -
 4
4 -
 5
5 -
 6
6 -
 7
7 -
 8
8 -
 9
9 -
 10
10 -
 11
11 -
 12
12 -
13
-
14
-
15
-
16
-
17
-
18
 |
 |