Epson R1900 User's Guide - PDF - Page 16
Printing From Start to Finish, Printing in Windows - stylus photo ink
 |
UPC - 010343866058
View all Epson R1900 manuals
Add to My Manuals
Save this manual to your list of manuals |
Page 16 highlights
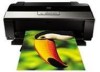
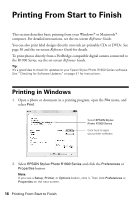
Printing From Start to Finish This section describes basic printing from your Windows® or Macintosh® computer. For detailed instructions, see the on-screen Reference Guide. You can also print label designs directly onto ink jet-printable CDs or DVDs. See page 30 and the on-screen Reference Guide for details. To print photos directly from a PictBridge-compatible digital camera connected to the R1900 Series, see the on-screen Reference Guide. Tip: It's a good idea to check for updates to your Epson Stylus Photo R1900 Series software. See "Checking for Software Updates" on page 41 for instructions. Printing in Windows 1. Open a photo or document in a printing program, open the File menu, and select Print. Select EPSON Stylus Photo R1900 Series Click here to open your printer software 2. Select EPSON Stylus Photo R1900 Series and click the Preferences or Properties button. Note: If you see a Setup, Printer, or Options button, click it. Then click Preferences or Properties on the next screen. 16 Printing From Start to Finish
-
 1
1 -
2
-
3
-
4
-
5
-
6
-
7
-
8
-
9
-
10
-
 11
11 -
 12
12 -
 13
13 -
 14
14 -
 15
15 -
 16
16 -
 17
17 -
 18
18 -
 19
19 -
 20
20 -
 21
21 -
22
-
23
-
24
-
25
-
26
-
27
-
28
-
29
-
30
-
31
-
32
-
33
-
34
-
35
-
36
-
37
-
38
-
39
-
40
-
41
-
42
-
43
-
44
-
45
-
46
-
47
-
48
-
49
-
50
-
51
-
52
 |
 |