Epson R300 Product Information Guide - Page 10
Removing and Installing Ink Cartridges - stylus photo ink cartridges
 |
UPC - 010343848818
View all Epson R300 manuals
Add to My Manuals
Save this manual to your list of manuals |
Page 10 highlights
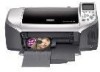
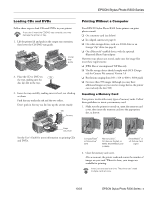
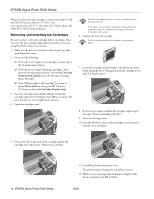
EPSON Stylus Photo R300 Series When you need new ink cartridges, contact your dealer or call the EPSON Store at (800) 873-7766 or visit www.epsonstore.com (U.S. sales only). In Canada, please call (800) 463-7766 for dealer referral. Removing and Installing Ink Cartridges Be sure you have a new ink cartridge before you begin. Once you start the ink cartridge replacement procedure, you must complete all the steps in one session. 1. Make sure the printer is turned on and not printing, then open the printer cover. 2. Do one of the following: ❏ If the red b error light is on (cartridge is empty), press the b maintenance button. ❏ If the red b error light is flashing (cartridge is low), press the b maintenance button. You see Ink Cartridge Replacement highlighted in the Advanced Settings menu. Press OK. ❏ If the b error light is off, press the button to choose More Options, then press OK. Press the button to select Ink Cartridge Replacement. 3. You see a message on the display telling you that ink cartridge replacement will begin. Press OK to continue. The print head moves to the replacement position. 4. Open the cartridge cover. Keep ink cartridges out of the reach of children and do not drink the ink. If ink gets on your hands, wash them thoroughly with soap and water. If ink gets in your eyes, flush them thoroughly with water. 6. Unwrap the new ink cartridge. Don't touch the green circuit boards or remove any labels. 7. Lower the cartridge into the holder, with the green circuit board facing the front. Then gently push the cartridge down until it is firmly seated. 8. If you need to replace another ink cartridge, repeat steps 5 through 7 before continuing with step 9. 9. Close the cartridge cover. 10. Press the left front corner of the cartridge cover forward to lock the cover into place. 5. Press in the tab on the back of the cartridge and lift the cartridge out of the printer. Dispose of it carefully. 10 - EPSON Stylus Photo R300 Series 11. Press OK and close the printer cover. The printer begins charging the ink delivery system. 12. When you see a message that charging is complete (after about a minute), press OK to finish. 10/03
-
 1
1 -
2
-
3
-
4
-
 5
5 -
 6
6 -
 7
7 -
 8
8 -
 9
9 -
 10
10 -
 11
11 -
 12
12
 |
 |